Saturday, May 11, 2013

Hello! Welcome to my blog and thank you for stopping by. I design and create handcrafted greeting cards. I like to call this passion of mine "visual poetry" ....imagery on paper. Please feel free to browse the photos of my cards and leave a comment.

Sunday, June 30, 2013

Your Special Day


Hello, crafting friends! I made this card for a challenge at Two Sisters in  which the theme was "stripes."  I had this pretty striped digital paper and thought it would make a nice card that really could be used for a masculine or feminine card, depending on how it was designed

I used GKD ivory card stock for my base card. Next, I added a layer of GKD pumpkin spice card stock. Before adhering the striped panel, I stamped my sentiment, from GKD Celebrate the Season stamp set, in the center and some HFC Feather Grass flourishes in three corners. I finished if off by adding some bling embellishments to each of the three cornera as well.

Hope your day is filled with inspiration and creative ideas!


This card was entered into the following challenge(s):
Two Sisters  -  Challenge #150 - Stripes
613 Avenue Create  -  Challenge #26 - Anything Goes


Friday, June 28, 2013

Tiled Rose


This card was made using a technique called "Faux Tiles". It was the theme of the Tutorial Challenge at Speedy TV.  Here is a Link to the tutorial.

First, I prepared my base card in GKD warm cocoa card stock. Next, I added a white layer. Then I cut another layer in GKD honey mustard using Spellbinders Locking Loops die and adhered that to the white layer. 

For my focal point I scored a white panel, both horizontally and vertically, every 1/2 inch. Then I stamped my rose image, from GKD Stately Flowers 6, lightly onto the scored panel. Next, I carefully colored the image with Copics, making sure not to color in the score lines.When colored, I adhered it to the locking loops layer.

My sentiment is from GKD Dogwood and Butterfly stamp set. I stamped it in black on white card stock and then embossed it with clear EP. It was then cut and embossed with Spellbinders Classic Ovals Small. I cut and embossed another oval in honey mustard using Spellbinders Classic Scalloped Ovals Small. I matted the sentiment layer with the scalloped oval and popped it onto the card. 

If you've never tried this technique, I hope you do. I know you'll be happy with the end result.  


This card was entered into the following challenge(s):
Speedy TV - Tutorial Challenge #55 
Sister Act  -  Challenge #13
TTCRD  -  Anything Goes - Jun 25 - Jul 2 
The Outlawz  -  Anything Goes - CPC062813


Wednesday, June 26, 2013

Just for You II


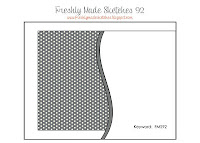
The card I made today was for a sketch challenge at Freshly Made Sketches. Here's a photo of the sketch:

I started out with an ivory card base, the front of which I embossed with a Darice embossing folder. I made two curved borders with Spellbinders Curved Borders One dies: one with open scallops in a dark brown patterned paper, the other with just a plain curved border in a lighter brown patterned paper. I adhered the two together, allowing the scalloped border to show from underneath the plain border. This was then adhered to the left half of the front of the base card. 

The flower was created with HFC Sun Kissed Fleur stamp, which is a large stamp of various size flower petals, and then cut with the coordinating HFC Sun Kissed Fleur die. I used Copics to color some petals in blue and others in brown. I alternated the colors when I arranged the flower and added a pearl to the center. The leaf branch was cut from brown paper with a Memory Box Lorelei Leaf die.

The sentiment (GKD Spring Mix STV Kit) was stamped in Memento Espresso Truffle ink and sponged with TH Distress Ink while still in the die. Then Memento Rich Cocoa ink was sponged on all four edges of the sentiment.

I wanted the flower to stand out. If I chose brown or ivory as my color choices for the flower, I felt it would just get lost in the background. I love blue and brown together so I decided to use blue and brown to create the flower. The blue in the flower just draws the eyes to it. I do like how it turned out. Hope you liked it too.

Thanks so much for stopping by. Have a crafty day!


This card was entered into the following challenge(s)
Freshly Made Sketches  -  Challenge #92 - FMS92


Tuesday, June 25, 2013

Joyful Song


This card was made for a color challenge where the colors to be used were red, green and white. The challenge also included a "twist".....something to do with "music".

I decided to make sheet music my focal point. I stamped the sheet music image (PTI Background Basics: Sheet Music) with black ink on white card stock and then cut it with Spellbinders Classic Ovals Small die. I cut another oval in red card stock using a die from Spellbinders Classic Ovals Large. I layered the focal image on the red oval.

The base card was made using black card stock. I added a red layer and then a white dotted swiss layer. The focal image was then adhered to the center of my card. I added a leafy swirl in black, cut from Marianne Creatables Anja's Vintage Swirls. I cut two flowers with Marianne Flowers Fantasy die, sponged them with white ink while still in the dies and then layered one on top of the other and adhered it to my card. The fern-like leaves were made using a Martha Stewart punch and then adhered to the flower.

The sentiment was computer generated and then cut with Spellbinders Labels Trio die. I thought those particular words from Bob Dylan's song Forever Young were perfect for this card.


This card was entered in the following challenge(s):
The Outlawz -  Color Challenge  CC0625
TTCRD  -  Anything Goes Jun 25 - Jul 2
Oozak  -  Challenge #16 - Anything Goes w/ Sentiment
613 Avenue Create  -  Challenge #25 - Anything Goes
Sister Act  -  Challenge #12  - Anything Goes

Monday, June 24, 2013

Ladybug Hello


Summer time bring bugs, but some of them are really cute....like the ladybug. Even though they're "bugs", you can't help but love 'em.  So I chose to use a ladybug for this CAS card.

I created the lady bug by using scalloped circles for the body and wings. The head was made by a small circle die. After assembling the little ladybug, it was popped onto the card with dimensionals. The antennae and swirl were stamped in black ink. The sentiment was stamped on white card stock in black ink and then cut out with a scalloped circle. This was then adhered to another scalloped circle, slightly larger, and on red dotted swiss paper.

Here is the list of the main products that I used to make this card:
GKD card stock in white
Red dotted swiss digital paper
Spellbinders Classic Scalloped Circles die
Spellbinders Standard Circles die
Memento Tuxedo Black ink

Thanks for stopping by to visit and I hope your day is a sunny one!


This card was entered into the following challenge(s):
The Outlawz - CAS062313


Sunday, June 23, 2013

Summer Fun


Summer has finally arrived here in the US. As the weather gets warmer and warmer, residents rush to the beaches for some relaxation and summer fun. And so "beach" is the theme of this card challenge.

The little cutie in the swim suit is a digital stamp from Whimsie Doodles.  I colored her with Copic markers except for her swim suit, the sash on her hat, her bag and towel which were all paper pieced. The beach ball is a stamp from GKD Beach Bum and was colored and cut out with a Spellbinders Standard Circles die.

Hope your summer started out great and that we can all get to relax on sunny beaches before it comes to an end. Enjoy your day!

This card was entered into the following challenge:
MFP Speedy TV - Challenge 165
Oozak  -  Challenge #16
Two Sisters  -  Challenge # 149

Saturday, June 22, 2013

Birthday Scroll


It's 10:30 a.m. and the temp in my neighborhood is already 81 degrees and climbing. Need to get out that pitcher of lemonade or an ice cold beer to cool off.  Really appreciate the central A/C that I had installed just last year.

And the heat kept me inside to make a clean and simple birthday card which was the theme for today's challenge at Less is More.  I stamped my base card with one image, colored it with copics, added a sentiment and topped it off with a pretty butterfly. And that was it.

Here are the products I used:

Card Stock:  GKD
Stamps:   HFC Sun Kissed Tags & Basket, PTI Delightful Dahlia
Ink:         Memento Tuxedo Black
Butterfly:   Spellbinders Les Papillions Two
Accessories:      Copic Markers, dimensionals

Don't you just love making CAS cards? With just a few strokes with ink and markers a lovely project can be created.  Hope you enjoyed this one.


This card was entered into the following challenge(s)
Less is More - Week 125
Sister Act  -  Challenge #12 
Oozak  -  Challenge #16


Friday, June 21, 2013

Birthday Wishes in Plaid


I would have never thought to use a plaid pattern for a card other than a masculine one. So I was pleasantly surprised how pretty this came out. The camera, however, did not capture the colors as well as I would have liked. 

I cut the front bottom edge of the base card with Spellbinders Scalloped Borders One. The plaid patterned paper, which is digital, was cut and adhered to the base card. I used Marianne Creatables Branch Garden die to create two leafy branches in black and adhered them in opposite corners on the plaid panel.

The flowers (HFC Striped Sun Kissed Fleur) were first stamped in black ink and cut with the coordinating HFC Sun Kissed Fleur dies. I colored them with Copics, layered them, added black Stickles to the center and popped them on to the leafy branches.

My sentiment is from GKD Elegant Florals and was stamped in black ink on a label cut with Spellbinders Labels Seventeen. I sponged the label while still in the die with PTI Melon Berry ink.

I love the striped flowers stamp and coordinating die and I am sure they will be used often. And now that I know that you can use plaid patterns for cards other than masculine ones, I will surely make more.

Thanks for visiting my blog and please, don't hesitate to come again! Have a great weekend!


This card was entered into the following challenge(s):
Joan's Gardens  - JG0620
Sister Act - Challenge #12
Oozak - Challenge #16

Thursday, June 20, 2013

Make My Heart Bloom


This card was made for an "inspiration" challenge. The inspiration for this project was to come from one of three pillows, each with a different pattern. Here is a photo of the pillow I chose that inspired my card.....


 I chose black card stock for my base card. On both the front and back side edges of the base card I created borders with Spellbinders Bracket Borders One die. Next, I cut a panel in white card stock just a bit smaller than the front of the base card. Using a different border die from the same set I  created a border on the right side edge. I then adhered this to the base. 

The lattice was made using a Cheery Lynn French Lattice die. I created a frame from Spellbinder's Labels Seventeen, using the largest die and the next to the largest die. The lattice panel was adhered to the back of the frame and then the edges were trimmed to fit within the frame. Then I adhered this lattice frame to my card/

The sentiment is from GKD Friends are Forever stamp set and was stamped in black ink on white card stock. Using another size die from Spellbinders Labels Seventeen,  I cut out and embossed the sentiment. Black ink was sponged around the edges. The final addition was the poppy flower, cut from Spellbinders Poppy Patch die in both red and green card stock and then paper pieced and adhered to the sentiment label.


This card was entered into the following challenge(s);
MFP Speedy TV  -  Inspiration Challenge #16 - Pillows
The Outlawz  -  TT062013


Wednesday, June 19, 2013

Poppies in the Spotlight


Red or orange poppies are one of my favorite flowers to color. They are part of my ethnic heritage and have been embroidered on ethnic costumes, decorative towels, etc., since the beginning of time. I chose this Hero Arts Poppy Background stamp to make this card for a challenge calling for the "spotlight" technique.

I prepared my base card, 5x5 inches, in white. I cut and embossed a black panel with a Cheery Lynn Dutch Scalloped Square die and adhered it to the base card. I added another layer in white which was cut and embossed with Spellbinders Adorning Squares die.

For my focal point I used a brayer to ink up my poppy background stamp in GKD black ink. I stamped my background on white card stock. I inked up the stamp once again and stamped it a second time on another piece of white card stock. One of these background stamped layers was then adhered to my card. 

With the second stamped background I colored an area that I wanted to "spotlight" using Copic markers. When done coloring, I used Spellbinders Standard Circles to cut out that colored area. Using a die from the same set, I cut another slightly larger circle in white and adhered it to the back of the "spotlight"  circle. This was then popped on my card, aligning it with the line art background image. Hence, the "spotlight". 

The sentiment, from GKD Framed Greetings, was stamped and then die cut with Spellbinders Scalloped Rectangles Small. And that  completed my project.

Hope you enjoyed this post. I enjoyed making this card to share with you.


This card was entered into the following challenge(s):
MFP Speedy TV - Sketch with a Twist Challenge #51


Tuesday, June 18, 2013

Simply Miss You


"White Space" was the theme of today's 365 Cards challenge in which we were to create a card using only l/4 of it and leaving the rest totally blank; no design, just plain white.

I stamped my image and sentiment (both from GKD Botanicals stamp set) in Memento Tuxedo Black ink. And that was it. So clean and simple.


This card was entered in the following challenge(s):
365 Cards - Day 169 - White Space Challenge
CDAC - Anything Goes Apr 1-Jun 30 


Howling Wolf Birthday


Masculine cards sometimes pose a challenge for me. I find that it's not always an easy task to come up with a design or personal theme that I feel would be just right for that specific male individual. This is the card I made today for an upcoming birthday and which I'm also entering into several challenges.
 
I used GKD soft sand card stock for my base card. I die cut a layer in GKD blue denim with Spellbinder's Locking Loops and adhered it to the base. Next, I cut a white panel and sponged it with Memento Summer Sky. For my focal image I created a scene using an oak tree (StampScapes), prairie grass (Rubber Stampede), grass border (Rubber Stamp Tapestry) and a howling wolf (GKD Mountain Wilderness). All Images were stamped in Memento Espresso Truffle ink. I stamped another image of the wolf in black ink on a small separate piece of white card stock, cut it out and popped it on the stamped wolf image to give it some dimension. The sentiment is from PTI Butterfly Dreams stamp set.

After the card was completed, I was pleased with the result. I hope my recipient likes it too.

Hope your day is filled with creative and crafty ideas!


This card was submitted to the following challenge(s):
The Outlawz - CAS061613
TTCRD - Anything Goes Jun 18-24
CDAC - Anything Goes Apr 1-Jun 30
FOSTV - Challenge #77 - Birthday


Sunday, June 16, 2013

Gift From Above


Happy Father's Day to all the dads out there! Hope it was a memorable one!

"Y" is the theme of my card project for today, meaning that I needed to make a card that contained an image that began with the letter "Y" or had the letter "Y" in the sentiment. I chose to use an image of "Y"arn, one ball of which was "Y"ellow.

I used ivory card stock for the base. I cut a strip of brown card stock and die cut and embossed it with Spellbinders Curved Borders. Using the same die, I cut a panel in kraft and embossed it with a Darice basket weave embossing folder. I adhered the brown and kraft layers, allowing the brown layer to show from underneath the kraft layer. This was then adhered to the base.

The basket of yarn image, from GKD Close Knit Friends stamp set, was stamped on ivory card stock, colored with copics and then cut with one of the dies from Spellbinders Decorative Labels One and sponged with Memento Desert Sand. The sentiment, from the same stamp set, was stamped on ivory, cut with Spellbinders Scalloped Ovals Small and sponged. The focal image and sentiment were popped on to the card and a bow was added to complete the project.


This card was entered into the following challenge(s):
 Speedy Fox and Friends -  Challenge #164


Saturday, June 15, 2013

Follow Your Dreams


Here's another graduation card I made. This one is more of a "girly" one.

I cut a panel of white card stock measuring 6.5 x 4.5 inches.  This was going to be the front of my base card. I cut and embossed the lower edge of this panel with two different dies from Spellbinders Bracket Borders One. I cut a strip of red card stock about 2 x 4.5 inches and cut and embossed it with one of the dies from the same set. It was adhered to the base above the die cut bottom edge. The patterned paper, which is digital, was cut the length of the base card, one edge cut and embossed with the same die as the red strip, and then adhered to the base, just above the red, trimming the top to fit.

The image of the graduate is a digital stamp printed on white card stock and colored with Copics. It was cut and embossed with Spellbinders Romantic Rectangles, layered onto a red panel and then popped on with dimensionals. The sentiment was computer generated and then cut and embossed using Spellbinders Distressed Edges die.

For the back of the card, I cut another panel, the same size as the front, cut and embossed the bottom edge with the same two dies that I used on the front white base. The bottom edges of both the base front and base back of the cards are the same. I scored the upper edge of the back panel about 1/2 inch from the top, added a strip of adhesive tape and attached it to the top edge of the front panel.

Thanks for stopping by and have a sun filled day!


This card was entered into the following challenge():
The Outlawz  - Copic/Promarker School's Out/Graduation Challenge
Sister Act  -  Challenge #11


Friday, June 14, 2013

You Did It!


Besides being the month for Father's Day, June is also graduation month for many. My card celebrates the Grads.

I thought a wise owl would be a good image for a Grad. I started out with a white base card. I layered it with a black lattice patterned digital paper.  (I really liked that digital paper pattern.) I cut and embossed white ovals using the largest oval from Spellbinders Beaded Oval dies and the second smallest oval from the same set for my sentiment. The leaf branch was made from a Memory Box Lorelei Leaf die which I die cut in black. The owl, from Hampton Art, was stamped in Memento Tuxedo Black ink, colored with Copics and cut out. The mortar board is a solid stamp from PTI and was stamped in black and also cut out. The diploma is a digital stamp that I printed  and cut out and adhered to the small oval with the sentiment, which was computer generated. All images were popped on with dimensionals.

I wasn't sure how this card would turn out, but after it was all done, I really liked it.  Hope you did too!


This card was entered into the following challenge(s):
The Outlawz - Copic/Promarker School's Out/Graduation Challenge
Sister Act - Challenge #11
613 Avenue Create - Challenge #23

Get Well Wishes


This is a Get Well card, a fancy one at that, that I made for today. I used kraft card stock for the base. I cut a white layer and cut out the design using a Marianne Creatables Anja Corner die. I stamped a leafy flourish from HFC Feather Grass Flourish in opposite corners in Memento Toffee Crunch ink.

The flower was cut in kraft card stock using Marianne Creatables Flowers Fantasy die and then embossed. While still in the die, I sponged on white ink. 

The circle was cut from Spellbinders Stately Circles and embossed. Two floral images (HFC Tattered Blossom Swirls) were stamped with Versamark and embossed with white EP.  The sentiment, from GKD Whimsical Wishes stamp set, was also stamped with Versamark and embossed in white. As you can see from the photo above, the recipient would pull out the circle to read the sentiment. 

Like all cards, it looks much better in real life. I hope you liked it. And thanks for stopping by my blog.


This card was entered in the following challenge(s):
Sister Act - Challenge #11


Thursday, June 13, 2013

Father's Day


Father's Day is celebrated all over the world, traditions varying from country to country. In the United States Father's Day is celebrated on the 3rd Sunday of June every year. This year it falls on June 16.

This is the card I made for Father's Day. I cut and scored the base card in ivory card stock. Before folding it I embossed it with the largest of the dies from Spellbinders Matting Basics A. I cut and embossed a layer in sage green using the largest die from Spellbinders Matting Basics B and adhered it to the base card. I cut one more layer in ivory from the second largest die from the same B set. The sentiment was  computer generated.

My pine cone image was stamped, colored with copics, and cut out. The image is from GKD Stately Flowers 6 stamp set. The pine branches were cut from green card stock using Impression Obsession dies. The branches were adhered to the ivory layer and the pine cone was popped on with dimensionals.


This card was entered in the following challenge(s):
Joan's Gardens - JG0613
The Outlawz -  Anything Goes - TT061313
Sister Act -  Challenge #10
TTCRD - Anything Goes Jun 11-17

Tuesday, June 11, 2013

Celebrate Today


Today I made a "celebration" card that could be used for almost any celebratory occasion: birthday, anniversary, retirement, etc., a good card to have on hand.

I used peach colored card stock for my base card. I added a layer of ivory, a layer of digital patterned paper in a darker shade and a final layer of a pretty peach pastel digital patterned paper. Before adhering the top two layers, I attached a ribbon and bow.

For the focal point, I die cut the second largest die from Spellbinders Marvelous Squares in ivory. Next, I die cut the next smaller die from the same set but I used the darker peach paper for this. For the sentiment (PTI Round & Round) I used Memento Tuxedo Black ink and stamped it on ivory card stock and then die cut it with the third largest die from Spellbinders Adorning Squares. I sponged around the sentiment while still in the die using PTI Melon Berry ink and then popped it on with dimensionals.

This turned out to be a very lovely card and I'm looking forward to giving it on a special occasion. 


This card was entered into the following challenge(s):
613 Avenue Create - Challenge #23 Anything Goes
TTCRD -  Anything Goes Jun 11-17
Sister Act  - Challenge #10 


Monday, June 10, 2013

Striped Birthday


Today was a rainy day...a good day to stay indoors and work on your favorite things. I worked on a card project which I submitted into a couple of challenges.
 
I made a very simple greeting card with black and white stripes. The white card base measures 5 1/2  L x 4 1/4 W. The only layer I added is the black and white striped patterned paper, cut and attached diagonally. I adhered a black ribbon where the patterned paper meets the white card stock. The sentiment is from PTI Birthday Bash Sentiments stamped with Memento Tuxedo Black ink. The flower was created with different size dies from Heartfelt Creations Delicate Asters dies. (I just love that die set!) The leafy ferns were made by a Martha Stewart punch.

And that's it for today. Hope your day is full of sunshine!


This card was entered into the following challenge(s):
The Outlawz - GCC0610
MFP Speedy TV - Simple Salutations Challenge #48

Sunday, June 9, 2013

On My Mind


Sunday's challenge at The Outlawz called for a clean and simple card....with pearls added. This is what I created for that challenge.

I used white card stock for my base. I cut and embossed a blue layer with the largest die from Spellbinders Matting Basics A and adhered it to the card base. For my focal image I cut and embossed a white layer using Spellbinders Matting Basics B. For my images I used various botanical stamps from different stamp sets. Using Memento Blue Danube ink, I first stamped my image on a piece of scrap paper and then stamped it on the white layer. I did that with each image to give it a soft look. My sentiment is from PTI Blooming Button Bits and was stamped with Memento Tuxedo Black. I added a border around the white panel with a Memento marker.

The butterfly images were cut with Spellbinders Les Papillions Two, the solid one on blue card stock and the outline on white. I adhered the two together and added 3 blue pearls on top. 

This was a quick and very easy card to make. I think the images used would be appropriate for a sympathy card as well.


This card was entered in the following challenge(s):
The Outlawz - CAS060913

Forever Friends


I recently purchased several floral dies and/or stamps and wanted to work with them right away. And this week's challenge at Joan's Gardens was the perfect time. The criteria for the challenge included embossing the background, using pink and black as the color theme and using an oval. 

I started out with white card stock for my base. I cut a pink layer and used a Martha Stewart punch-around-the-page punch to create my design on all four edges. (Unfortunately, I never labeled any of my MS punches so I don't know their names). I then cut another layer in white card stock and embossed it with a Darice embossing folder. Both the pink and white layers were then adhered to the white base card.

The black flourish was created with a Memory Box Amira Flourish die. For the oval I used two different Spellbinder die sets: Floral Ovals for the black oval and Beaded Ovals for the white oval. The sentiment was computer generated.

Now for the flower. This was created from two Marianne Creatables Flowers Fantasy dies, one large and one small. After cutting out and embossing these flowers, and while still in the die,  I sponged them with Memento Angel Pink ink, layered the small flower over the larger one and adhered them together. I love the way it turned out. For the center, I added some tiny black beads. The flower was then popped onto the flourish with dimensionals and fern leaves added, made  by a Martha Stewart punch, to complete the look.

Hope you like this card as much as I enjoyed creating it.  Have a crafty day!


This card was entered into the following challenge(s):
Joan's Gardens - JG0606


Saturday, June 8, 2013

Every Day Worth Celebrating


Hope everyone is enjoying their weekend so far. I've enjoyed mine by doing some craft shopping and stocking up on my supplies.

Here's what I made today for the CDAC challenge.....that took me since yesterday.  My MOJO was nowhere to be found.... I call it "crafter's block".  I hope I'm not alone in this dilemma.

This card measures 5x5 inches. All card stock is from GKD. The base is innocent pink in color. I cut a  layer from white card stock and punched a scalloped edge across the top using an MS punch. Then I cut a scalloped border on the bottom edge with one of the  Spellbinders Curved Borders dies.  The sentiment (GKD Stately Flowers 6) was stamped in black and embossed with clear EP.  I cut a smaller black layer and cut a border on the bottom edge with the same curved border die. The white and black layers were adhered together with the black layer peeking out from under the white. This was then adhered to the pink card base.

The flower was created by stamping several different sizes from the stamp set (HFC Bold Delicate Asters) onto white card stock, colored with Copics and then cut out with HFC Delicate Asters dies and adhered together. The black centers were created using the same die set as were the larger green leaves. The smaller fern leaf branch was made by an MS punch.

When finished, I took several photos of this card because I wanted the camera to pick up the dimensional scope of the flower.  This photo seemed to be the best one.


This card was entered into the following challenge(s):
CDAC - Anything Goes


Tuesday, June 4, 2013

Every Happiness


And here is my third card for the Silver & Gold challenge at The Outlawz. It's more or less a combination of my first two cards. I used silver card stock for the base, embossed a leafy vine in gold, die cut a silver circle on which I stamped and embossed my sentiment, and added wedding bells. I just love that leafy vine stamp. I will be using it a lot, I'm sure.

That's all for today. Hope you enjoyed my cards and maybe even got inspired. Have a wonderful day!


This card was entered in the following challenge(s):
The Outlawz - Silver & Gold  GCC0603

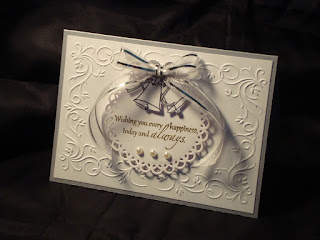
Today and Always


This was my next silver and gold card......a wedding card. Again, I used silver card stock (GKD) for the base followed by a layer of white on which I embossed a frame using a Nellie Snellen embossing folder. I stamped my sentiment, from GKD Elegant Florals stamp set, using Versamark on white card stock and embossed it with gold EP. Then I die cut it with Spellbinders Stately Circles and positioned it in the middle of the frame. The bells are a digital stamp which I cut out and adhered to the circle. I added silver Stickles to the bells' clappers and a silver edged ribbon and three white pearls  to give the card a finished look.

Not too much work in making this card. The toughest part was cutting out the bells. I'm not very good at rounding corners with scissors. Must have been absent when that was being taught in grade school.


This card was entered into the following challenge(s):
The Outlawz - Silver & Gold  GCC0603
613 Avenue Create  - Challenge #22 Anything Goes Create Your Own

Golden Anniversary


Silver and gold for couples was the theme of Monday's challenge at The Outlawz. I started out making one card and ended up making three...the other two will be detailed in the next posts.

For my first card I made an Anniversary card. I used silver card stock (GKD) for my base. On white card stock (GKD), I stamped a leafy vine (Hero Arts) with Versamark and embossed it with gold EP. My sentiment, from GKD Elegant Post, was also stamped in Versamark and embossed in gold. I added a gold edged ribbon as the final step.

This was a simple card to make....clean and simple. Not too much fuss, but elegant looking. Once again the camera, unfortunately, did not capture the lovely gold embossed detail very well.  Hmmm...or maybe it's the photographer....


This card was entered into the following challenge(s):
 The Outlawz - Silver & Gold  GCC0603


Monday, June 3, 2013

Birthdays Are Feathers


Sunday's CAS challenge at The Outlawz was themed "Pillow Fight". No, we didn't have to create anything with pillows....it was feathers! Anything having to do with feathers was to be shown on our project, be it a bird or feather duster, etc., as long as it followed the CAS (clean and simple) challenge guidelines. 

I started out with a base card in apple green (GKD). I didn't have any feather stamps that I felt would fit the bill so I did some searching and found a peacock feather digital stamp. I also found a quote on line that I really liked and that I thought could be used as a sentiment on this card since it complimented the feather image. I printed out the feather and sentiment on white card stock (GKD), quickly and easily colored the feather with Copics, and layered it on the green base. I cut 2 thin strips of the green card stock and adhered them to the left side of the focal point layer.

This was a quick and easy project. I do love CAS challenges. Less is always more.
Happy Crafting!


This card was entered in the following challenge(s):
The Outlawz - CAS "Pillow Fight"


Sunday, June 2, 2013

Friends Are Forever


I recently received the Spellbinders A2 Curved Borders One dies. I went searching for ideas today. My inspiration came from some beautiful cards I found during my search.

The card looks much nicer in real life. The camera just didn't  capture the elegance of it. And as you can probably see, it turned out to be a tall card (H 6.5 x W 4.75). Since I don't have 12x12 card stock (all mine is 8.5x11), I made it to open by flipping up the front. The back of the card is scored at the top edge and adhered to the back top edge of the front.  It flips open like some cell phones. Does that make sense?

The card stock I used in this project is ivory and blue (two of my most favorite color combinations) from GKD. The base card is ivory followed by a layer of blue. I die cut 2 of the scalloped borders from the die set in ivory. In addition, I cut and embossed the center of each of the border panels with one of the dies from Spellbinders Radiant Rectangles. In the center of that die cut, I added a die cut oval in blue from Spellbinders Floral Ovals.

I made a folded ribbon bow from my stash of ribbons and  adhered it to the lower left portion of the card. The butterfly was made by 2 separate Spellbinders Les Papillions dies....the solid (shadow) one in blue card stock and the open one in vellum.

I didn't know whether to add a sentiment or not because I didn't want every inch of space on the card covered. So I opted to computer generate a sentiment and then used a die from Marianne Creatables Small Ovals by Petra and inserted it behind the folded bow. The sentiment says "friends are forever".

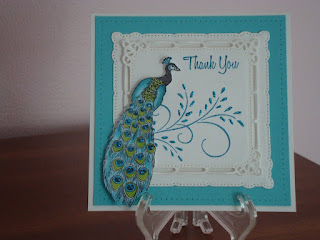
Thank You Peacock


Do you have stamps that you acquired quite a while ago but seldom used. I know I do. Well, I decided to dig one out and see what I could do and this is what I came up with.

The peacock stamp is from GKD Pretty As a Peacock stamp set, one that I've had for several years but used only once. I colored it with Copics and cut it out. The flourish is from HFC Feather Grass and the sentiment is from GKD All Occasion Tags. Both were stamped with Memento Teal Zeal ink on white card stock. 

After stamping the flourish and sentiment, I used Spellbinders Marvelous Squares to die cut the panel. Using the largest die from that same set, I die cut another panel in white. I then attached the 2 panels using dimensionals.  

I cut the base  card (5x5") from white card stock.  I pierced a turquoise layer all around the edges and adhered it to the base. The white panels were then attached to that layer and the peacock image was popped on with dimensionals. I added Stickles to the leaves of the flourish and the tail of the peacock.

I feel as if I've given that peacock stamp a second chance at redeeming itself. And I think it has.