Saturday, May 11, 2013

Hello! Welcome to my blog and thank you for stopping by. I design and create handcrafted greeting cards. I like to call this passion of mine "visual poetry" ....imagery on paper. Please feel free to browse the photos of my cards and leave a comment.

Monday, October 14, 2019

Autumn Birthday


My favorite season is autumn. It always reminds me of sunflowers, wheat, colored leaves, crisp air, my college days, football, chili and beef stew. And I LOVE to make fall cards. Here is another one that I made for my college roommate from many years ago. Our birthdays are 4 days apart and when in college we celebrated our birthdays together.

These are the products I used in this project:

Card Stock:  GKD Ivory, Kraft, Daffodil Delight, Vibrant Violet; SU Mossy Meadow, Wisteria Wonder; PTI Chocolate Brown; Gold Metallic (unknown)

Inks:  Distress Oxide Wild Honey, Memento Grape Jelly

Dies:  Spellbinders Create a Sunflower, Labels Two; Cottage Cutz Sunflowers (for the leaves only); Marianne Grape Hyacinth; MB Blushing Flower Branch; IO Wheat; Cheery Lynn Wheat Heads 

Other:  adhesive, dimensionals, ribbon, Wink of Stella. computer generated sentiment.

I hope you enjoyed this post and get inspired to create some beautiful fall cards. Thank you so much for visiting my blog. Come back again soon.


Thursday, October 3, 2019

Sunflower Birthday


Hello Fall!  It is finally here....after 90 degree weather days!  And here is my first fall card this year, made for a former co-worker's birthday.  Sunflower and colored leaves.....the representatives of autumn.

Here are the products used:

Card stock:  GK Ivory, Kraft, Cherry Red, Daffodil Delight; SU Garden Green: PTI Dark Chocolate
Ink:  Memento Rich Cocoa, Cottage Ivy; Hero Arts Red Royal; Wild Honey Distress Ink
Dies:  Spellbinders Create a Sunflower, Darice Leaves, SU Leaflets Framelits, Poppy Stamps Pointed Oval Frames
Other:  adhesive, dimensionals, computer generated sentiment

Hope this inspires you to create some fall cards. Until next time, happy crafting!


Sunday, August 18, 2019

Blue Jeans Birthday


My daughter's birthday falls this month. She's a "Jeans" kind of gal and so I decided to highlight that as the theme in my card project for her. Here is what I came up with.....

I created my base card first in order to know how big to make the jeans image. I do not have a jeans die so I searched for a jeans template and tweaked it somewhat. I resized it to the size I needed to fit on the base. Next I printed it out on jeans card stock and recreated the stitch marks. I wanted the pockets to be open so I printed a set out and attached them to the existing pockets by adhering them on 3 sides leaving the tops open. I went over the stitching with a black marker and stamped a design in the center of the pockets. A pink flower was added to the pockets to make the jeans a bit feminine.  As a final touch I found and resized a jeans' label and tag and attached the label to the waist band and the tag to the edge of one of the pockets.

To my white base card I added a layer of GKD Denim card stock followed by a layer of pinkish wood panels. The jeans image was adhered to the base with dimensionals.  The sentiment was computer generated and popped on with dimensionals.

That completed my project and I was happy with the way it turned out.  

Thanks for stopping by today!  Hoping you have a great week!


Sunday, July 14, 2019

Dragonfly Birthday


Hello, fellow crafters!  Today's card was created for my SIL who loves dragonflies and whose birthday falls this month.

Here are the products/tools used in making this card:

Card Stock:  GKD White, Bubblegum Pink, Black Onyx; SU Garden Green
Stamps:  SU Dragonfly Dreams Set
Inks:  Distress Oxide (various shades used in coloring the dragonfly)
Dies:  MB Blushing Flower Branch, MB Delicate Fern, SU Detailed Dragofly, Sue Wilson Double Pierced Squares, tiny circle dies (from various die sets)
Other:  craft scissors, dimensionals, adhesive, foam tape, black faux velvet, bricks EF

The dragonfly image was stamped, colored and die cut with its co-ordinating die. The floral images were cut twice, once in green and a second time in pink. The pink flowers were then cut off their pink stems and adhered (paper pieced) onto the green floral die cut. Black faux velvet centers were added to the pink floral images. The fern branches, flowers and dragonfly were then all positioned on the brick panel and adhered with adhesive or dimensionals.

The sentiment was computer generated, cut out with craft scissors and popped on the brick panel with dimensionals. The sentiment wording "Darting around...." was followed by the message inside the card which read....."to send you birthday wishes".

The brick focal panel was then adhered to the pink and black layers and then to the white base card. As a final touch, I added glitter to the dragonfly.

Thank you for stopping by!  And, til next time, make it a great day!

Friday, May 3, 2019

Flowing Floral Basket


Hello!  I have what I call a "phone pal" (instead of a "pen pal") that I have been friends with for many years. This is someone I've never met but had work related telephone conversations with frequently over the many years that I worked. Over time this led to a friendship and continued even into retirement and beyond where we would call each other and send birthday and Christmas cards. My "phone  pal's" birthday is this month and this is the card I made for her.

Using white card stock I die cut a panel with a rectangular cross stitch die. This would be my focal panel. Next I die cut a garden fence in white card stock and adhered it to my focal panel. A die cut grass edge was added to the base of the fence.

The basket was cut in kraft card stock and then sponged with Distress Oxide ink. It was adhered to the fence with dimensionals.  Next, the two (2) flower branches were die cut in green and the little flowers in violet card stock. Yellow card stock was used to create the flower centers. The little flowers were adhered to the branches which were then positioned and adhered to the panel.

To complete the scene, I added some die cut butterflies in violet, adding Wink of Stella to give them some shimmer. As a final touch a watering can was added which was die cut out of silver metallic card stock, sponged with gray ink, positioned and adhered to the fence at an angle.

For the last step, the focal panel was matted with violet card stock followed by white card stock and then adhered to the white base card both of which were cut with stitched rectangles dies. This last step completed my project.

Here is a list of products used:

Card Stock:  GKD White, Vibrant Violet, Kraft, Wild Dandelion, Shimmering Silver; SU Garden Green
Ink:  Distress Oxide Vintage Paper
Dies:  Sue Wilson Garden Circle Scene, Frantic Stamper Flower Basket, Bent Blossoming Branch, Avery Elle Butterflies, Leane Creatief Watering Can.
Other:  adhesive, dimensional tape, Wink of Stella pen, 

I hope you enjoyed this post. Thank you for visiting and please come back soon.  Any and all comments are most welcome and appreciated.

Until next time....make it a great crafting day!


Jukebox Birthday


When  I create my cards, I always hope to come up with a theme that personally relates to the individual I'm making the card for.  More often than not it takes me several days of bouncing ideas before I realize "that's it!"  The card above was made for my brother who was turning 64 this month. One idea led to another and this was the final result.

I began with adhering burlap to a red panel. This would be my focal panel.  The musical score "When I'm Sixty-Four" was computer generated and the edges trimmed with craft scissors and then sponged with Distress Oxide Vintage Photo ink.  This was adhered with dimensionals on an angle to my focal panel.  

My next step was to create the jukebox.  I die cut the jukebox twice.....in silver card stock and in red card stock. Wherever you see the red parts of the jukebox  these were the pieces that were punched out from  the silver die cut. Then they were replaced with red. I added a mini record to the jukebox to make it look authentic. When completed the jukebox was adhered to the focal panel with dimensionals.  

Since the song "When I'm Sixty-Four" is from the Beatles' album Sgt. Pepper's Lonely Hearts Club Band, a mini replica was adhered to the musical score.  The happy birthday sentiment was stamped on white card stock, die cut and then the edges trimmed with craft scissors and sponged with the same ink as the musical score.

This completed my focal panel. To balance the color scheme, I matted this panel with 2 more layers of card stock (kraft and black).   Finally, this was adhered to my base card.

Here are the products used in creating this card:

Card Stock:  GKD Pure Luxury White, Cherry Red, Kraft, Black Onyx, Whisper; Burlap; Silver and Red Mirror paper.
Ink:  Distress Oxide Vintage Paper, Versafine Onyx Black
Stamps:  GKD Country Roads 2
Dies:  Tonic Studios Rococo Jukebox Jive, Spellbinders Labels Trio
Other:  Mini record albums, mini record, adhesive, dimensionals, craft scissors, sponge dauber 

Thanks so much for stopping by!   Until next time, happy crafting!


Tuesday, March 19, 2019

Birthday Gifts Trio


Hello!  The wife of my younger nephew has a birthday this month. Here's the card I made for her.

Since I didn't know how large the card would be I started with my focal panel.  Using white card stock I cut a 5"x 6 1/4" panel. Next I die cut squares in various colors using a die from Sue Wilson's Ornate Pierced Squares.  These were then layered with matching dotted swiss digital paper. A white ribbon was added and the bows were die cut from 3 different die sets:  SU Pretty Pines, Memory Box Crisp Bows, and Frantic Stamper Gifts and Bows. These were adhered to the gift boxes and set aside.

Next, the frame was created from GKD Pure Luxury White card stock using 2 dies from Sue Wilson's Double Stitched Rectangles. This was then adhered to the focal panel using foam tape. The gift images were positioned and then adhered in the frame with foam tape.

The base card was created in GKD Pure Luxury White card stock and layered with digital patterned paper. The focal frame was then adhered to the prepared base card and my project was complete.

Thanks for visiting!  Hope you were inspired to make it a great crafting day!

Wednesday, February 27, 2019

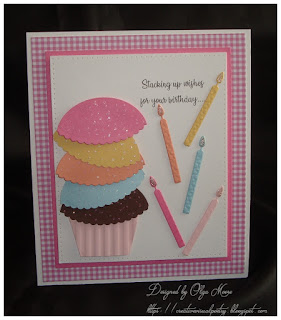
Stacked Cupcake Birthday


Hello fellow crafters!  Here is a card I made for my nephew's wife's birthday. She is a master at baking and I thought I'd offer a little competition with my stacked cupcakes (chuckle).

I began with creating my base card in white card stock. It was layered with pink gingham digital paper. This was put aside to work on my focal panel.

A panel was die cut in white card stock. Before adding any images, I decided on a greeting and then had it generated by my computer. Since I didn't have any cupcake dies, I had to improvise. I created the cupcake liner by embossing a piece of pale pink card stock. To create the cupcake tops I used an oval die and a scalloped oval die and created 5 cupcake tops in various colors. I added glitter to each cupcake top and then positioned them one on top of the other. The candles were die cut and a Jelly Roll pen was used to add shimmer to the flames. I matted my focal panel with hot pink card stock and then adhered it to my prepared base card.

Here are the products used in this project:

Card Stock:  GKD Pure Luxury white, hot pink (unknown), various colors; gingham digital paper
Dies:  Sue Wilson Double Pierced Rectangles, Hero Arts Infinity Ovals, Spellbinders Classic Scalloped Ovals, Divinity Designs Birthday Candles
Embossing Folder:  SU Textured Impressions Corrugated Dynamic
Other: glitter, dimensionals, Jelly Roll Clear Star pen

This was a fun card to make. Thanks for visiting! 
I hope you enjoyed this post and will stop by often.
Happy Crafting!


Wednesday, February 13, 2019

70th Pink Floral Birthday


Hello Crafters! Do you celebrate Valentine's Day? I have a friend whose birthday falls right on Valentine's Day. How lucky can one get!  Each year when I create a card for my friend, I make sure there is a heart image somewhere in the card to recognize Valentine's Day.  In the above card, I added a heart inside the card with the word YOU in it, incorporating the heart image in my birthday message.

Here are the products used in creating this card:

Card Stock:  GKD Pure Luxury White (base card), Black Onyx; Crafter's Companion                                      Shimmering White Pearl and Pink Pearl (for the layer and focal panels).
Ink:  Memento Tuxedo Black, Angel Pink (for the flowers)
Dies:  Sue Wilson Double Pierced Square Set B, Chloe die;  Spellbinders Floral Ovals,
              A2 Distressed Edges;  HFC Sun Kissed Fleur;  Provo Craft Cuttlebug Numbers die (old dies)
Stamps:  GKD Country Roads 2  (for greeting)
Other:   Adhesive, dimensionals, black pearls, sponge dauber

Hope you enjoyed this post and will come back to visit again soon. In the meantime, 
Happy Valentine's Day!  Make it a great one!


Saturday, February 2, 2019

Sweater Card


Hello, fellow crafters!  I hope those in the Winter Blast area this week are safe and warm.  Here in Ohio we had air temps at 0 with wind chills at -25 to -35 degrees. Thankfully it only lasted 2 days and spring-like weather arrived for the weekend.  But winter is not over yet by a long shot. Sigh....

Since I stayed indoors during this arctic blast, I made this sweater card for my dearest friend's birthday. I was going to use my cable knit EF but thought this other folder would give it a more feminine look. Here are the products used in this project:

Card Stock:  GKD Pure Luxury White, Just Peachy (unknown brand)
Dies/Punches:  circle die, Martha Stewart Doily Lace Edge punch, corner punch,
Embossing Folder: Darice Interlocked Circles
Other:  lace, buttons, adhesives

For anyone interested in how to make a sweater card, here is a link to a web site: Sweater Card . This is the perfect time of the year to make a sweater card. I hope you will be inspired to create one if you haven't already. I know you'll be happy with the result.

Thanks for visiting my blog. Please come by often. 
Until next time, make it a great creative day!


Thursday, January 31, 2019

Kick Up Them Heels Birthday


Hello, everyone!  Masculine cards are ones that I don't make very often....and it's always challenging to come up with a theme. This is one I made for one of my nephews' birthdays. When I attended his wedding this past fall, there was a lot of line dancing done by the young crowd.  That's what gave me inspiration for this card.

I created my card base using GKD Pure Luxury Ivory card stock. This was layered with GKD Kraft card stock and then with GKD Black Onyx card stock. I put this aside to work on my focal panel.

I cut a piece of ivory card stock (5"x5") and scored it at one inch intervals. Next, I swiped Stampin' Up Crumb Cake ink over the layer (pad to paper) and then sponged the edges with Memento Tuxedo Black ink. This would be the front panel on which the die cuts would be adhered.

The boots and guitar were cut with Tessler Crafts Western Cowboy die set in  GKD Tan Leather card stock. Each image was backed with black mirror paper. The greeting was computer generated on tan leather card stock, cut with a die from Spellbinders Disteressed Edges and then sponged with black ink on all four edges. All die cut images were then positioned on the focal panel and adhered using dimensionals. Brads were added to the greeting "sign" and some twine was attached to the sign as an added effect.

Even though I listed the supplies used in the body of this post, here is a breakdown of all products used: 

Card Stock:  GKD Ivory, Black Onyx, Kraft, Tan Leather
Inks:  SU Crumb Cake, Memento Tuxedo Black
Dies:  Tessler Crafts Western Cowboy Set, Spellbinders A2 Distressed Edges
Other: scoring board, twine, brads, sponge dauber, adhesive, dimensionals


This completed my project. I hope you enjoyed this post and have been inspired to create.
Thanks for stopping by and come by often.


Sunday, January 27, 2019

Rose Arch Wedding Card


This card was made for my older nephew's wedding which took place this past fall.  The wedding was held in Tennessee. I flew into Georgia to stay with my brother and sister-in-law for about a week. We drove 4 hours to the wedding venue and stayed in TN for 2 nights. It was a lovely wedding and the bride and groom made a very handsome couple.  


Here are the products used in creating this card:

Card Stock  -  GKD Pure Luxury White, Silver, Cherry Red, Black Onyx
Dies:  - Spellbinders 5x7 Detailed Scallops; Sue Wilson's Ornate Pierced Rectangles, The Happy                     Couple, Rose with Wedding  Rings; Die-Namics Garden Gate; Leane Creatief Love Die
Punches  -  Martha Stewart Fern
Other  -  White bows, pearls, adhesive, dimensionals


I hope you enjoyed this post and will stop by often. Thanks for visiting! Any and all comments are most welcome. Have a great day!