Hello! I've been occupied with other things so I haven't had time to post too much for a while. My last project for this month is this wedding card that I designed and created for one of my nephews who got married this month. The wedding was in northern Georgia and the reception was held in a barn. It was so quaint and positively charming! May the beautiful bride and handsome groom have many, many years of wedded bliss!
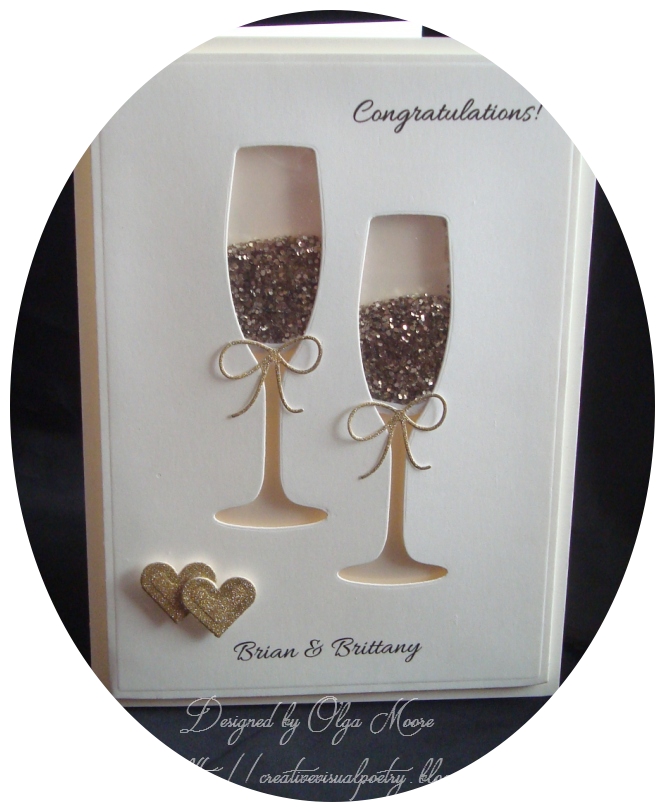
I decided to make my card in ivory (GKD Ivory) instead of the tradition white. I began by working on the card front panel (a.k.a. shaker panel), cut to measure 4 7/8 x 6 7/8. Then, after determining the placement of the images I planned to use, I computer generated the greeting and name of the couple. Next, the champagne glasses, using a Die-Namics Layered Champagne Glass die, were positioned and cut out, each one separately, leaving the negative space (the actual cut outs were saved for another time, another project). Then the card front was embossed with a die from Spellbinders 5X7 Matting Basics A.
Next, I adhered a piece of acetate on the back of the card front which would serve as the "see-through" portion. Then, still working on the back of the card front, I created a tight gap-free frame around each champagne glass using adhesive foam strips in order to create a shallow space for the shaker elements to sit it. Now, I had planned to use gold glitter for the shaker elements inside of the champagne glasses. However, I had to figure out a way to keep the glitter from falling into the glass stems. I ended up using a thin piece of a foam strip where the glass meets the stem. I also placed foam strips around all the edges of the panel to make it level. I did not remove the protective lining from the adhesive foam strips at this time.
Now came the tricky part....adding the glitter and keeping it isolated in the space it was intended for. I used a tiny spoon to carry the glitter from its container to the space in the champagne glasses.
Satisfied that there was a sufficient and equal amount in each glass, the protective layers from all the foam strips were very slowly removed. I had previously prepared a piece of card stock, slightly smaller than the card front, and adhered this to the back of the shaker panel to keep the glitter inside the glasses.
Bows, cut from glittery gold card stock with a die from Frantic Stamper Gifts and Bows, were adhered to the base of the wine glasses to conceal the foam strips hiding there. The two hearts were cut using Spellbinders Classic Hearts in glittery gold card stack and positioned with dimensionals, one heart slightly over the other.
This completed my front panel. The last step was to adhere the panel to my base card and the card was done. This took a lot of time and patience, but I was very pleased with the end result. I hope the young wedding couple liked it as well.
Christmas is just about 9 weeks away and I have to start moving on making my Christmas cards. (Where did the year go?) So that will be my project for the next many weeks. And hopefully I will have them done in time for mailing them out.
Thanks so much for stopping by. I hope this card gave you some inspiration to create. Until next time, make it a great day!

