Saturday, May 11, 2013

Hello! Welcome to my blog and thank you for stopping by. I design and create handcrafted greeting cards. I like to call this passion of mine "visual poetry" ....imagery on paper. Please feel free to browse the photos of my cards and leave a comment.

Monday, March 30, 2015

Cherry Blossoms


Hello everyone! Today I'd like to share a card that I made using one of my favorite images....the cherry blossom. I have several cherry blossom stamps and I decided to use this digital one from Stampin' Up. I thought it would look great using black and white and that's what I went with.   

I began with a white piece of card stock. I sized my image, positioned it on the card stock and then generated it. Next, I used a die from Spellbinders Majestic Labels to create the embossed frame.  My sentiment, from GKD Framed Greetings, was stamped with Memento Tuxedo Black ink. Having completed my focal panel, I adhered it to a black card base and it was done. I love how it turned out. 

Thank you for visiting my blog. I love to read your comments, so please feel free to do so.


This card was entered into the following challenge(s):
The Outlawz  -  GCC Challenge - GCC0330 - AG
613 Avenue Create - Challenge #117 - AG
Crafting from the Heart  -  Challenge #53 - AG
Simply Create Too  -  Challenge #82 - AG
Aud Sentiments -  Challenge #128 - AG
Word Art Wednesday  -  Challenge #176 - AG

Sunday, March 29, 2015

Faux Laser Cut Birthday Card


Happy Sunday! Today I made a card using the faux laser cut technique. Here is a video link showing how to make this type of card.

This photo illustrates the faux laser cut a bit better
I used the following products in my project:

Card Stock:  GKD white, blue denim
Dies: Spellbinders Standard Circles, Memory Box Bella Bouquet
Stamps:  GKD Vertical Greetings 2, Mountain Wilderness, and Fabulous Frame Fillers
Ink:  GKD Blue Denim
Other:  adhesive, dimensionals, clear EP

Thanks for stopping by and checking out my post.
Get creative and have a great day! 


This card was entered into the following challenge(s):
613 Avenue Create  -  Challenge #117 - AG
Sentimental Sundays  -  Challenge #252 - Springtime Flowers
Sister Act  -  Challenge #99 - AG
Aud Sentiments  -  Challenge #128 - AG plus a Sentiment
The Crafter's Cafe  -  Challenge #109 - Spring Flowers
Crafting from the Heart  -  Challenge #52 - AG
Crafty Cardmakers and More  -  Challenge #135 - Spring has Sprung
Inspiration Destination  -  Challenge #26 - AG
Papertake Weekly  -  Challenge Mar 24 - A Cut Above
Word Art Wednesday  -  Challenge #176 - AG

Saturday, March 28, 2015

Easter Blessings


Hello! In one week Easter will be upon us. Although it is a holy season for Christians around the world it is often considered the harbinger of spring as well. We expect to see robins, the birth of flowers as they come up from winter's frozen ground, fresh green grass and sunshine. As we celebrate this holy season I think of excited children dressed in their finest going to Grandma's house for a meal of their families' traditional Easter foods, of Easter egg hunts and lots of chocolate bunnies with the ears still intact. That's what I think of when Easter nears. 

This year we just may have a white Easter. I was thinking positive when I made this Easter card even though when I look out my window my green grass is covered in white. Sigh....

I began with creating my focal panel. I used white card stock and embossed it with a die from Spellbinders Radiant Rectangles. Next, I cut  a large cross from Spellbinders Crosses die in white and another smaller cross in purple card stock. I adhered the two crosses together, the smaller over the larger, and added a white pearl in the center. I put this aside.

Using a Memory Box Lavish Branch die, I made 2 cuts...one in green card stock and the other in purple. I cut off  the flowers of the purple die cut and adhered them over the flowers in the green die cut.  This was then positioned around the cross and all was adhered to the card. Tiny pearls were added to the centers of the visible flowers. Finally the focal panel was adhered to a white card base and that completed my card.

Thank you for stopping by and visiting  my blog.  Wishing everyone a happy and blessed Easter. May you be surrounded by family and friends and good food and drink. 


This card was entered into the following challenge(s):
613 Avenue Create  -  Challenge #116 - AG - Opt Twist: Purple
Sister Act  -  Challenge #99 - AG
Brown Sugar  - Challenge #139 - Easter
Crafting from the Heart  -  Challenge #52 - AG
Fan-Tastic Tuesday  -  Challenge #78 - AG - Opt Twist: Easter
Inspiration Destination  -  Challenge #26 - AG
Mod Squad  -  March 25 Challenge - Easter
Papertake Weekly  -  March 24 Challenge  - A Cut Above
TTCRD - Challenge - Wk of  Mar 24 - AG
Word Art Wednesday  -  Challenge #176 - AG

Thursday, March 26, 2015

Spotlight - Apple of my Eye


Hello everyone! I hope spring has arrived in your neighborhood. My area is expecting snow this weekend. Do you believe it! And there's a possibility that snow will be coming for Easter Sunday! Mother Nature just won't give in to Spring. 

Apples always remind me of fall even though they are around all year. So I decided to use this apples image in a card I made for Stamp TV's Monday's Challenge where the theme was to use a technique called "spotlighting".

The image is from GKD called Harvest Memories which I stamped on GKD white card stock in black ink and then cut the panel with Spellbinders Adorning Squares. Before removing it from the die I sponged around the edges with GKD Sweet Corn ink.  I also punched some holes around the edges of this panel to add a bit more interest. 

Next, I stamped the image again on another piece if white card stock and colored it with Copic markers. This would be my "spotlight".  I used a circle die to cut out part of the image. Using another circle die just a bit larger, I cut another circle in patterned paper. The "spotlight" was matted with the patterned paper circle.

I used GKD Sweet Corn card stock as my base card and added a layer of the patterned paper. Then I adhered my focal panel with dimensionals. The "spotlight" circle was then lined up with my focal image and adhered. 

The sentiment was computer generated and cut using Spellbinders A2 Modern Stationary die. I punched  some holes in opposite corners and that completed my project.   

Hope you enjoyed this project and will consider trying the spotlight technique if you haven't yet. There are a couple of different ways to do this technique. I provided a link above to one of them.

 I love your comments so please feel free to leave them. Until next time, 
think SPRING and make it a great and creative day!


This card was entered into the following challenge(s):

Stamp TV  - MIUM Challenge - STV15MON12 - Spotlighting
613 Avenue Create  -  Challenge #116 - Anything Goes
Crafting from the Heart  -  Challenge #52 - Anything Goes
TTCRD  -  Challenge - Week of March 24  -  Anything Goes
Inspiration Destination  -  Challenge #26 - Anything Goes
Word Art Wednesday  -  Challenge #176 - Anything Goes
Kraftin Kimmie Wonderful Wednesday 25 -  Anything Goes


Sunday, March 22, 2015

Screen Divider Card


I think screen room dividers are so beautiful. Many of them have panels with asian art or Japanese motifs. I decided to make one as a birthday card. 

My base card is white card stock and the panels are GKD Cherry Red card stock. The pattern on the panels was created with some floral stamps I had using Versamark and embossed with white EP.  The sentiment was computer generated and die cut with an oval die. Various size butterflies were added to finish it off.

Just fold the card and place a ribbon around it and it's ready for mailing.


I hope you enjoyed this post and will be inspired to make one of these beautiful screen fold cards. Here's a link to instructions on how to create one. I'm sure you will be pleased with the result.

Thanks for stopping by and please stop by often. And your comments are always most welcome.


This card was entered into the following challenges:
Aud Sentiments  -  Challenge#127 - Week 2 - Anything Goes
Brown Sugar Challege   -  Challenge #138 - Anything Goes
Crafting from the Heart  -  Challenge #51 - Anything Goes
Fan-Tastic Tuesday  -  Challenge #77 - Anything Goes
Inspiration Destination  -  Challenge #25 - Anything Goes
One Stitch at a Time  -  Challenge #233 - Anything Goes
Papertake Weekly  -  Challenge 3/17/15 - Happy Anything
Sister Act  -  Challenge #98 - Anything Goes
TTCRD - Challenge Mar 17-23 - Anything Goes
Tuesday Throwdown  -  Challenge #236 - More Than One Fold
Wags 'n Whiskers - Challenge #150 - Monochromatic
Word Art Wednesday  -  Challenge #175 - Anything Goes

Thursday, March 19, 2015

Thoughtful White Butterfly


Hello, my crafty friends!  I've been on sabbatical for a while. Had  a lot going on and on top of that my mojo decided to take a leave of absence as well.  Hopefully it's back, although not in full force.

I saw a card on line that inspired me to create this one. It's a  pretty simple card made with an embossing folder, patterned paper and a couple of die cuts. And I die cut and embossed using my new Crossover die cutting machine by Cheery Lynn. It does quite a nice job of cutting and embossing. I did have trouble cutting a Spellbinders die (not shown) which was intricate with thin stems of flowers. I found that the machine would not make a clean cut in the middle. I tried various tactics but still did not get the result I expected. I will have to look into how to correct this. Other intricate dies have cut out perfectly. Here's a photo of the Crossover.


I hope my mojo sticks around so I can get back to doing what I love and sharing it with my crafting friends.
Until next time, have a wonderful and creative day.

I am thrilled to announce that my card was selected as one of the TOP THREE in the  Dies R Us Challenge.


This card was entered into the following challenge(s):
613 Avenue Create  -  Challenge #115 - Anything Goes
Crafting from the Heart  -  Challenge #51 - Anything Goes
TTCRD  -  Challenge Mar 17-23  -  Anything Goes
Creative Moments  -  Challenge #64 - Anything Goes
Fan-Tastic Tuesday  -  Challenge #77 - Anything Goes
Word Art Wednesday  -  Challenge #175 - Anything Goes
Sister Act Challenge  -  Challenge #97 - Anything Goes
Inspiration Destination  -  Challenge #25 - Anything Goes
The Crafter's Cafe  -  Challenge #108 - What Season Are You In
Crafting for All Seasons  -  Challenge #98 - Pastel Hues
Dies R Us  -  Challenge #22 -Shades of Green
Great Inspirations  -  March Challenge - Go Green

Friday, January 30, 2015

Pleated Dress Birthday


Hello fellow crafters! Here's a birthday card I made using a pleated dress pattern that I found on line. I love how this came out and will be making another one in a different color scheme.

Instead of going into the steps of how I created the dress, here's a link to a video tutorial on how to create the pleated dress and here is the pattern I used. (I added a lace hem to the dress to make it a bit more fancy).

After completing the dress, I put it aside and worked on preparing my base card and layers. I used white card stock for my base card, layered it with pink followed by gray and then a light gray patterned paper. I attached the dress pieces and bow to my card with adhesive and dimensionals. The sentiment was computer generated and then cut with Spellbinders A2 Distressed Edges. die.


Hope you like this card. Thanks for taking the time to stop by! Be back again soon!


I am so pleased to know that my card was a WINNER  in 613 Avenue Create's challenge and in the TOP 3 picks in Through the Craft Room Door's challenge. 
Thank you!


This card was entered into the following challenge(s):
Sister Act  -  Challenge #91 - Anything Goes
613 Avenue Create  -  Challenge #108 - Anything Goes
Sentimental Sundays  -  Challenge #243 - Anything Goes
Love to Create  -  Challenge #151  - Lace/Ribbon, Pearls/Gems, Fave Valentine Colors
Kraftin' Kimmie  -  Wonderful Wed Challenge - Anything Goes
Crafting from the Heart  -  Challenge #44 - Anything Goes
TTCRD  -  Challenge Jan 27-Feb 2  -  Anything Goes
Fan-Tastic Tuesday  _  Challenge #70 - Anything Goes
Seize the Birthday  -  Challenge Jan 29 - Anything Goes

Friday, January 23, 2015

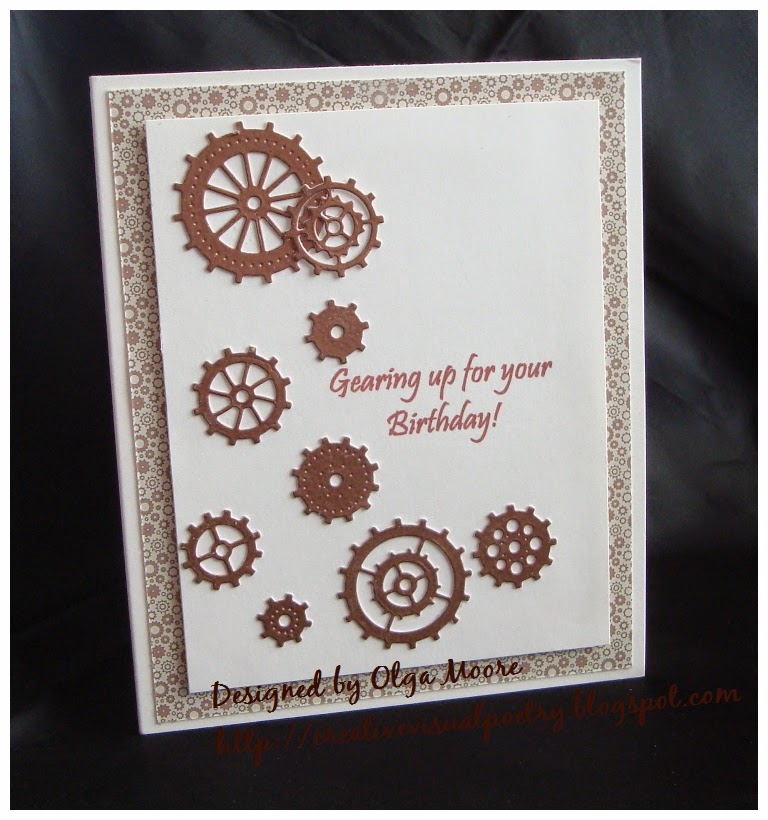
Gearing it up Birthday


It's been a while since I last posted. I needed a break from holiday card making as well as the holidays themselves. I'm rejuvenated and ready to go  So here is my first card of the year.....a masculine birthday card.

I wanted to use gears in my project. However, I wanted to have them copper colored. So......I took a piece of white card stock and embossed it with copper EP and then cut the gears with dies from Cheery Lynn. They came out looking very realistic.

Next, I prepared my focal panel using ivory card stock and had my sentiment computer generated. Then I adhered the gears randomly on the panel and put it aside to work on the base.

The base card was prepared in ivory card stock and layered with gear patterned digital paper that I found on line. In my final step I popped on my focal panel using dimensional tape. And that completed my project.

Hope you enjoyed today's project and were inspired to create. And thanks for stopping by! 


This card was entered into the following challenge(s):

613 Avenue Create  -  Challenge #107 - Anything Goes
Aud Sentiments  -  Challenge #123 - Anything Goes
Crafting from the Heart  -  Challenge #43 - Anything Goes
Creative Moments  -  Challenge #60 - Anything Goes
Fan-Tastic Tuesday  - Challenge  #69  -  Anything Goes
Sister Act  -  Challenge #90 - Anything Goes
Sisterhood of Crafters  -  Challenge Jan 14 - Anything Goes
TTCRD  -   Challenge Jan 20-25  -  Anything Goes
One Stitch at a Time  -  Challenge #128 - Anything Goes

Saturday, December 20, 2014

Christmas Cards 2014

Merry Christmas! I have been so busy trying to get my personal Christmas cards done in time to mail them out. I didn't want to post them on my blog until they arrived at the recipients' doors. So here are some of the cards I made for this Christmas.  Hope you enjoy them.


Poinsettia on Shimmery Tree

Blue Poinsettia on Shimmery Tree

Blue Christmas Wreath


Christmas Angel in White

Christmas Greeting Bells #1


Christmas Greeting Bells #2

Golden Holly Christmas
Red Poinsettia Outline

White Poinsettia Outline

Happy Holidays


Happy Holiday Bells

Nutcracker


Red Snowflake Ornaments

The Three Wisemen

Warm & Cozy Fire

White Wreath on Red Velvet #1

White Wreath on Red Velvet #2

White Deer Christmas

White on White Ornament

Red Snowflake Trio

White Mosaic Poinsettia on Red Velvet


Thank you for stopping by and please come again! . 


Merry Christmas and Happy Holidays to all my Facebook friends! Hope your holiday is a joyous one and the New Year showers you with good health and prosperity!

Thursday, October 30, 2014

Orange Poppies Easel Card


Hello, crafting friends! Today's card is an  easel card that I made for my DT entry in this week's The Outlawz Twisted Thursday "Anything Goes" Challenge....with the "twist" being an easel card.

I began with preparing and scoring my base card which would be the easel part of my card. The shape was cut using  a  Spellbinders Stately Circles die. (Here is a video tutorial on making a basic easel card. There are other videos on line demonstrating how to make shaped easel cards). I cut another identically shaped panel with the same die, stamped my image (from GKD Stately Flowers 1), colored it with Copics and added black glitter to the center of the poppy image. To add a bit more interest I adhered a small butterfly in black which was cut with a die from a Tattered Lace Butterflies. This would be my focal panel which would later be attached to my easel base. I put this aside to continue working on my base.

I layered the bottom of my "easel" with dotted swiss pattered paper. Next, I cut a smaller die cut piece, which was cut from the same Spellbinders die, and stamped my sentiment (from the same stamp set as my focal image). I added 3 black half-pearls above the sentiment which would serve as the "stopper" for my easel card. As a final step, I adhered my focal panel to my base card and my card was  complete. 

For mailing, the easel card folds flat as seen in the photo below:

 NOTE : Copic colors used for poppy:  YR07, YR04, Y17, YG61,YG63

 
If you are interested in complete details on how to create an easel card, make sure you view the video tutorial. There are many different styles and shapes of easel cards and you can find tutorials for them on line. Seeing how one is done is much easier than trying to read instructions. If you haven't made one yet, hope you will give it a try.

Thanks for visiting! And make it a great day!


Thursday, October 23, 2014

Poinsettia on Shimmery Tree


Hello everyone! Here is one of my first Christmas cards for this year. I usually make a different card for each recipient. There are so many beautiful possibilities that it is truly hard for me to choose to make just one type of Christmas card. But this year I am way far behind in my Christmas card making so I will have to limit myself to just a few different kinds.

I began with preparing my base card in white card stock. Next, I cut a panel in white a bit smaller than the front of my base and had my sentiment computer generated. My panel was then embossed with a Nellie Snellen Christmas Square 2 folder. 

The tree was cut with a Memory Box Winterland Tree die and covered with glitter. The poinsettia was cut with Sue Wilson's Mosaic Poinsettia die in red suede and Ranger Liquid Pearls was added to the center. The tree and poinsettia were then positioned and adhered to the focal panel. As a last step, the panel was adhered to the base with dimensionals and this completed my project.

Hope you liked this post. Thanks for stopping by and please come again. And I love to receive your comments so please feel free to add your thoughts.


This card was entered into the following challenge(s)
Stamp TV  -  MIUM Challenlge - Christmas Comes Early - STV14MON41
TTCRD  - Challenge Oct 21-Oct 27 - Anything Goes
Fan-Tastic Tuesday  -  Challenge #58 - Anything Goes - Twist: Add flowers
Word Art Wednesday  -  Challenge #155 - Anything Goes
Crafty Girls  -  Challenge #29 - Anything Goes

Spooky Halloween


Hello everyone! Halloween is just a little over a week away. Is everyone ready for the little goblins that will be appearing at their door? I enjoy the littlest ones trying to walk up my front steps and saying "trick or treat". They are the cutest!

Since there is NO twist for this week's Twisted Thursday Anything Goes challenge at The Outlawz, I decided to make a Halloween card. And I really had a lot of fun making it.

I wanted to create a Halloween night scene so I began by cutting a 4" x 6" piece of white card stock for my focal panel. I wanted to have a large moon portrayed in my project so I created a mask with a Spellbinders Standard Circles die and positioned it on my panel with removable adhesive. This would serve as the area that would be left uncolored while I sponged my panel. I used Memento Sweet Plum ink to sponge over the entire panel. Then I went over parts of the panel using Memento Summer Sky ink. This resulted in a pretty purplish/pink night sky.  I removed the mask and there was the big beautiful moon.

In my next step I used a branch stamp from PTI Trees stamp set and stamped the branch a few times on both the right and left edges of my panel using GKD Black ink. Using both the bat stamps and owl stamp from GKD Celebrate the Season stamp set, I positioned these on my panel in various spots and stamped them with the same black ink. The picket fence is a die from Impression Obsession and was cut in black card stock and adhered to my panel with dimensionals. I used a pumpkin image from GKD Always Autumn stamp set, colored it with Copics, cut it out and then used a Memory Box Perky Pumpkin Face die to cut out the face. I added a black layer under the finished pumpkin face and popped it on to the fence with dimensionals. At this point I matted my focal panel with black card stock. My sentiment was composed on my computer, printed out and then cut with craft scissors and sponged with black ink around all four edges. My focal panel being completed, I matted it with black card stock and put it aside to work on my base card.

My base card was prepared in black  and layered  with purple. The focal panel was adhered to my base and my project was done. I was happy with the way it turned out. Spooky, but with a soft look.

 Thanks for stopping by. And......hope you have a Spooky Halloween!


This card was entered into the following challenge(s):
TTCRD  -  Challenge Oct 21-Oct 27 - Anything Goes
Creative Moments  -  Challenge #54 - Anything Goes - Halloween
Word Art Wednesday  -  Challenge #155 - Anything Goes
Dies R Us  -  Challenge #12 - Halloween
Crafty Girls  -  Challenge#29 - Anything Goes
The ABC Challenge - Challenge Oct 15-Oct 31 - V for Vibrant
The Sisterhood of Crafters  -  Challenge Oct 22 - Fall Colors
Tuesday Throwdown  -  Challenge #218 - Halloween Colors


Thursday, October 16, 2014

Harvest of Wishes


Hello everyone! Today's card is one where I used one of my favorite coloring techniques: Prismacolor pencils and OMS (Odorless Mineral Spirits). The "twist" for the Anything Goes challenge at The Outlawz this week was to use your favorite technique and this is the one I chose for my Design Team project.

I stamped my image (GKD Always Autumn) in Memento Tuxedo Black ink on white card stock. Next, I colored the image using several different shades of Prismacolor Colored Pencils and OMS. (For anyone interested in how to do this technique, here is a link to a video tutorial).

After coloring, I cut my image panel using Sue Wilson's Innsbruck die and sponged around the edges with Memento Tangelo ink before removing it from the die. For my sentiment, I used a stamp from GKD's Harvest of Wishes stamp set and cut it with a small die from the same Sue Wilson die set. 

My base card was created from white card stock and layered with warm cocoa card stock. An orange layer was embossed with a Cuttlebug Gingham EF and adhered to my base card. My focal panel and sentiment were then popped on with dimensionals and a bow made from jute twine was attached to the sentiment for a finished look.

Hope you enjoyed this post and will check out the tutorial. If you've never used colored pencils and OMS, I think you'll find it a fun technique. Just make sure you have quality colored pencils and card stock. It makes a world of difference.

Until next time............make it a great day! 


This card was entered into the following challenge(s):
613 Avenue Create  - Challenge #93 - Anything Goes
TTCRD  - Challenge Oct 14-20  -  Anything Goes
Word Art Wednesday  -  Challenge #154 - Anything Goes
Sister Act  - Challenge #78 - Anything Goes 
One Stitch at a Time  _  Challenge #221 - Anything Goes with color Orange 
Fantastic Tuesday  - Challenge #57 - Anything Goes
Crafting from the Heart  -  Challenge #40 - Anything Goes
Aud Sentiments - Challenge #117  Week Two - Anything Goes
Wags 'n Whiskers - Challenge #139 - Fall Colors

Thursday, October 9, 2014

No One Like You


Hello fellow crafters! This is my DT card for this week's challenge at The Outlawz! The twist was an "outdoor" theme. I chose to use this image from Lee's Digi Shop who is this month's sponsor at The Outlawz.

I began my printing out my digital image on white card stock and coloring it with Copics. Next, I cut it using Spellbinders Decorative Labels Thirty Four. Before removing it from the die, I lightly sponged Memento Summer Sky ink around the edges (which isn't very visible in the photo). My sentiment was composed and printed out on my computer and cut with a die from Spellbinders Labels Thirty Six. I added a floral image that I had cropped from the focal image and colored it with Copics. I put this side while I prepared my base card.

I used white card stock for my base and layered it with denim blue card stock from GKD. Next, I cut a layer of GKD pumpkin spice card stock and cut a pattern using an Impression Obsession Fancy Cutout Border die. This was adhered to my base card. As my final step, I popped on my focal panel and sentiment panel using dimensionals and that completed my project.

Thanks for stopping by! Make it a great day!

This card was entered in the following challenge(s):
613 Avenue Create  -   Challenge #92 - Anything Goes
One Stitch at a Time  -  Challenge #221 - Anything Goes with Color Orange
Crafting from the Heart  -  Challenge #39 - Anything Goes
TTCRD  -  Challenge Oct 7 - 13  -  Anything Goes
Fan-Tastic Tuesday  -  Challenge #56 - Anything Goes with Wings
Word Art Wednesday  -  Challenge # 153 - Anything Goes
Creative Moments  -  Challenge #53 - Anything Goes
Crafty Girls  -  Challenge #28 - Anything Goes
Sister Act  -  Challenge #77 - Anything Goes

Thursday, October 2, 2014

Birthday Ride


Hi there! For this week's Twisted Thursday "Anything Goes" challenge at The Outlawz the twist was "take a ride". Here's my Design Team entry using an image from Lee's Digi Shop, which is this month's sponsor for The Outlawz. 

I chose  an image titled "boy on present" and colored him with Copics. Next, I cut out the panel with a die from Spellbinders A2 Valiant Honor. Before removing the panel from the die, I sponged around my image with Memento Cantaloupe and Tangelo inks. Since the little boy image was dressed in a long sleeved shirt and pants, I added a falling leaf, colored with Copics to show that autumn had indeed arrived. I used the wagon stamp from GKD Beyond Baskets stamp set and colored it with Copics and used a stamp from GKD Signs of Spring as my birthday greeting which I stamped on the wagon. I embossed the wheels and wagon handle to give them a shine. After cutting out the wagon, I adhered it to my focal panel with dimensionals to create the illusion that the little boy was sitting on a birthday present in the wagon.

I made my base card in white card stock and added a layer of patterned paper from my stash. I then adhered my focal panel to my base and my project was complete.

I hope you enjoyed this post and were inspired to create. Thanks for stopping by!


This card was entered into the following challenge(s):