Saturday, May 11, 2013

Hello! Welcome to my blog and thank you for stopping by. I design and create handcrafted greeting cards. I like to call this passion of mine "visual poetry" ....imagery on paper. Please feel free to browse the photos of my cards and leave a comment.

Friday, February 21, 2014

Happy Anniversary in Gold


I love gold on black, be it in cards or jewelry on clothing. Here was my chance to use this color scheme. Mod Squad's challenge was to "Go for the Gold" and create a card incorporating either gold, silver or bronze in our creations. I chose   gold.

I made my base card using white card stock and layered it with black. Using the rose image from GKD's Stately Flowers 6, I created my background on a white panel by stamping the rose flower randomly using Versamark ink and then embossing it with gold EP. This background panel was adhered to the black layer. All other images were also stamped with Versamark and embossed in gold.

The hearts were cut using dies from Heartfelt Creations Timeless Amour. I stamped my sentiment (GKS/s Elegant Post) on the larger heart and added leaf branches (GKD's The Vine). For the smaller hearts, on one I stamped the leaf branch and then added love birds from PTI Love Birds stamp set. On the other I used a small rose image from a wood stamp that I had on hand. These were all attached to my background panel and the project was complete.

I'm glad you stopped by and I hope you enjoyed this post. I'll be back soon with more.


This card was entered into the following challenge(s)
Mod Squad  -  Go for the Gold
Sister Act  -  Challenge #45 - Anything Goes
Word Art Wednesday  -  Challenge #120 - Anything Goes
TTCRD  -  Feb 18-24  -  Anything Goes
613 Avenue Create  -  Challenge #59 - Anything Goes
The Outlawz  -  Twisted Thursday - Anything Goes

Tuesday, February 18, 2014

Classy and Fabulous


Joan's Touch offered a challenge which was to include the colors of pink and black, a bow and a lady. This is what I came up with.

I started with a pink card base and added a black layer. For my focal point I needed to have an image of a lady but didn't have any that would work with the idea I had in mind. So I went searching and found this digital image at Just Inklined. I colored the image with copics, giving her a black dress with a pink waistband and hemline ruffles. I thought she looked pretty good (chuckle).

Now I had to come up with a sentiment. I had a stamp from GKD's Border Bling stamp set that I thought was perfect to use with the lady image. However, the stamp was too big and would not fit in the space I had open for a sentiment. So I computer generated it and it worked out very well. I then cut and embossed that panel with Spellbinders Radiant Rectangles and adhered it to the black layer.

I cut out the lady image and popped it onto the card. I added my bow to the upper left corner and it was done.

Thanks for stopping by!


This card was submitted into the following challenge(s)
TTCRD  -  Feb 18-24 - Anything Goes
Word Art Wednesday  -  Challenge #119 - Anything Goes
Sister Act  -  Challenge #44 - Anything Goes
613 Avenue Create  -  Challenge #59  - Anything Goes
The Outlawz  -  TT021314  - Anything Goes
Sunshine Mail   - Anything Goes - (Feb)
Loves Rubber Stamps -  Challenge #91 - Funny Sentiment
CMC Copic Challenge Group  - Challenge #87 - Anything Goes


Monday, February 17, 2014

Heal "Beary" Soon


Hi, fellow crafters! Hope all are safe and warm in the US Northeast. We're getting some clippers here in Ohio but nothing to worry about. We've had to struggle with several -0 temps and snow a couple of weeks ago but this week we're heading towards temps near 50 and rain.  YAY!

My brother and sister-in-law were touring Spain last month when my sister-in-law had a mishap and injured her right arm. After returning to the US she had to have her arm put in a cast for 6 weeks.

I thought the little teddy bear with its right arm in a sling was a perfect image for the card I wanted to make for her.So I started out with a light pink card base. I layered it with chocolate brown card stock. I added another layer of darker pink which was cut and embossed with Spellbinders A2 Distressed Edges die. For my focal point layer I used white card stock on which I had computer generated my sentiment and then cut and embossed it with a smaller die from the same die set. While still in the die, I sponged Memento Angel Pink ink over it.

The teddy bear image, from GKD's Under the Weather stamp set, was stamped in Memento Rich Cocoa ink, colored with Copics and then cut out. The floral image is from GKD's Grateful Heart STV Kit. I stamped this image in Memento Rose Bud ink. For the shadow effect, I inked the image in Memento Rich Cocoa ink, stamped it once on scratch paper, and then on my focal point layer. This layer was then adhered to my card and the teddy bear attached with dimensionals.

Here is a photo of the inside of the card:


Hope you enjoyed this post. I love to receive your comments so please feel free to add one. Until next time, Happy Almost Spring!


This card was entered into the following challenge(s):
The Outlawz  - GCC0217

Wednesday, February 5, 2014

Quilled Hearts Birthday


I have a good friend whose birthday happens to fall on Valentine's Day. (How lucky can you get?) So I decided to incorporate hearts into her birthday card. I have yet to master quilling but I came across a card on line with quilled hearts and thought that would be a perfect idea for my card.

My color scheme consisted of white, pink and black. I started out with white card stock for my base card. I added a layer of black and then a layer of soft pink. For my focal point I die cut a white panel using Spellbinders Radiant Rectangles and matted it with black. I stamped a tree branch from PTI's Out On a Limb Revised stamp set. The birthday greeting is from PTI's Birthday Bash Sentiments stamp set. I then adhered this panel to my card using dimensionals.

I made the quilled hearts in different sizes (took me a while) and drew lines of different lengths from the tree branch using Memento markers. Then the hearts were adhered to the ends of the lines.

I don't do much quilling at all although I love the effects. With more practice (and patience) I hope to master this art.

Hope you're having a wonderful day flowing with creative ideas. Thanks for stopping by!


This card was entered into the following challenge(s)
613 Avenue Create  - Challenge #57 - Anything Goes
TTCRD  -  Feb 4 Challenge  - Anything Goes
Sister Act  -  Challenge #42 - Anything Goes
Word Art Wednesday  -  Challenge #118 - Anything Goes

Wednesday, January 29, 2014

Trendy Birthday


A warm hello during this freeze that's hit so much of the US. Hope everyone is safe and keeping warm. I haven't stepped outside for several days except to peek out once a day to check mailbox. But a small heat wave is on the way....upper 20s and 30s.  LOL

I have a friend whose birthday is coming up and I made this card for her. I started out with cherry red card stock for the base. For the white layer I used Spellbinder's 5x7 Detailed Scallops die. Instead of leaving that layer plain in the center, I added a panel which was embossed with a Cuttlebug Swiss Dots folder. 

Using the Memory Box Happy Birthday Extravaganza die, I cut the birthday greeting in cherry red card stock and adhered it to the embossed dotted swiss layer. The pump was cut from a Memory Box Platform Pumps die and popped on with dimensionals.

For the inside of the card..............

I stamped the 3 dress form stands using GKD's Friendship Like Ours stamp set in dark red ink. The inside message was computer generated. And the shoe is the other half of the Memory Box Platform Pumps die which I popped on with dimensionals.


Hope you enjoyed this post and my card. Thanks for stopping by and please stop by often to see my cards. Have a great day!


This card was entered in the following challenge(s);
Word Art Wednesday  -  Challenge #117 - Anything Goes
613 Avenue Create  -  Challenge #56  -  Anything Goes
TTCRD  - Jan 27-Feb 4, 2014  - Anything Goes
The Outlawz - GCC0127 - Anything Goes 
Sister Act  -  Challenge #41 - Anything Goes 
MFP Speedy TV - Simple Salutations #82

Thursday, December 26, 2013

Blue Car Christmas


I really enjoyed making this masculine Christmas card which I designed for my daughter's boyfriend who just recently purchased a new car, blue in color.

Starting with white card base, I layered it with blue mirror paper, followed by a layer of silver embossed card stock. I added one more layer in white on which I created my focal point....the blue car (which was die cut).

I stamped some ornaments in blue and snow flakes in silver. I came up with what I thought was an appropriate "sentiment" for the theme and had it computer generated. On the inside of the card I added that ..."too bad, you already bought yourself one so maybe this will help to accessorize it" and then attached it to his gift.

I was so pleased that he liked his card and loved his gift!

Daughter Christmas


Hello everyone!  I hope you all had a wonderful Christmas with your family and friends and that Santa was good to you. I haven't posted any of my work for a while because I was busy making my personal Christmas cards and getting the house decorated and doing everything else that comes with my favorite holiday. And this Christmas turned out to be one of the best...nice cozy atmosphere, good food, great gifts and best of all...great company.

I couldn't post all the Christmas cards I made (each one was different) but I did showcase some of them in my last post. But I did want to post this card I made for my daughter which I gave to her on Christmas day.

The photo doesn't do it justice. I used white card stock for the card base and layered it with denim blue card stock which I had embossed with Spellbinders Adorning Squares dies. The words Merry Christmas and Daughter were created with Cheery Lynn individual script dies. And the snowflake burst in the lower right corner was cut with a Memory Box Snowflake Corner die.

The poinsettia was created with a Just Rite Festive Poinsettia stamp, which, by the way, is an absolutely stunning stamp. Various size poinsettia leaves were stamped on vellum, embossed with white EP and then cut out with Spellbinders Layered Poinsettia dies. Finally the cut leaves (petals) were layered to create the flower and a white pearl was added to the center.

My daughter loved her card, especially the poinsettia flower. I hope you like it as well.


Sunday, October 13, 2013

Christmas Elegance in Gold


Using gold in card making is ever so elegant, especially at Christmas time when creating cards for friends and family. Here is the card I made with that thought in mind.

For my base I used gold card stock and created a 5 1/2 x 5 1/2 base card. In the next step I cut a 5x5 inch panel in white. Using one of the Spellbinder Heirloom Ornament 2011 dies I cut out the die shape in the middle of that panel. This panel was then embossed with a Nellie Snellen Christmas Round-1 embossing folder.

I prepared another white panel, just slightly smaller than the embossed one and adhered it to the base card. Next, I die cut an ornament using the Memory Box Snowflake Ornament die and embossed it in gold. The bow was cut with a die from Memory Box Crisp Bows and also embossed in gold. I cut off the bottom part of the bow. The gold embossed ornament was adhered to the white panel. The embossed panel was popped onto the white panel, the gold ornament showing through the cut out, and the bow adhered at the top.

For the sentiment, I stamped it in Versamark using GKD's Sentimental Holiday stamp set and embossed it in gold. Then it was cut with one of the dies from Spellbinders Grommet Tags. To give the card a finished look, I cut some pine sprigs with Impressions Obsession Pine Sprigs Cluster dies, embossed them in gold and attached them to the sentiment tag.

I hope you enjoyed this post and are well on your way to creating your Christmas cards. It won't be long before the snow flies!


This card was entered into the following challenge(s):
2 Sisters Challenge Blog  -  Challenge #165 - Anything Goes
Word Art Wednesday  -  Challenge #101 - Anything Goes
Sister Act  -  Challenge #28 - Anything Goes
613 Avenue Create  -  Challenge #41 - Anything Goes

Friday, October 11, 2013

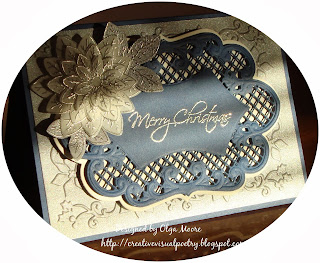
Silver Christmas


In making this card, I decided to use some not-so-traditional colors. I chose denim blue, silver and white. I started out with a base card in denim blue. Next, I embossed a silver layer with a Sizzix Peace Poinsettia folder and adhered it to my base card.

For the focal point of my card I started with a white scalloped oval cut from Marianne Creatables Anja's Large Ovals die. Next, I cut a lattice scalloped oval in blue denim using another of the dies from the same set. My sentiment (Stampabilities) was stamped in Versamark and embossed with silver EP. The completed panel was then popped onto the base with dimensionals.

The poinsettia was made by stamping an HFC Christmas Poinsettia background stamp on vellum, embossing the flowers with silver EP and then cutting them out with an HFC Sun Kissed Fleur die. The cut poinsettia petals were layered and then adhered to the card.

And this completed my project. Until next time, make it a creative day!


This card was entered into the following challenge(s):
613 Avenue Create  - Challenge #40 - Anything Goes
Sister Act  - Challenge #28 - Anything Goes
TTCRD  -  Oct 8 Challenge - Anything Goes
Word Art Wednesday  -  Challenge #101 - Anything Goes
Oozak  -  Challenge #23 - Anything Goes

Believe


Hello! Seventy five days to go before Christmas gets here. Although I enjoy the "spookiness" of Halloween and the "feasting" on Thanksgiving, Christmas is by far my most favorite holiday. I love to dress up the inside of my home with a  beautifully lit tree, Christmas villages, candles, pine branches, etc. I don't dress up the outside except for a lit wreath on my door. And on a snowy night, when all the homes are lit up, it is absolutely gorgeous!

Here I am talking about snow when we've had some beautiful weather and there's more to come. But I've zoomed in on Christmas and finding it easier and easier to make my Christmas cards.

Here is one of the cards I made today. It starts out with a white base. On another piece of white card stock layer I created an embossed frame with Spellbinders 5x7 Matting Basics A die. On the bottom edge of this layer I stamped my sentiment (from HFC Holly Berry stamp set) in black ink and embossed it with clear EP. This layer was then matted with red and adhered to the base. 

For my wreath I first created a base (a ring) to which to attach the pine sprigs. The base was made with green card stock using two Spellbinders Standard Circle dies, one inside the other to create a ring. Next I cut many pine branches in the same green card stock using Poppy Stamps Pine Sprigs dies. Then, one by one, I adhered the pine branches around the circle to create the wreath.

I cut a circular frame from Marianne Craftables Tiny Hearts die in white card stock. Next, I cut a lattice oval using a die from Marianne Creatables Anja's Vintage Frame and adhered this to the back of the circular frame. The wreath was then adhered to the completed frame and popped on to the card with dimensionals. For the final touch I added red Stickles to imitate berries and a tiny red bow.

Hope you enjoyed this post! Thanks for stopping by.

This card was entered into the following challenge(s):
Word Art Wednesday  -   Challenge #101 - Anything Goes
613 Avenue Create  -   Challenge #40 - Anything Goes
TTCRD  -  Oct 8 - Anything Goes
Sister Act  -  Challenge #28 - Anything Goes
Oozak  - Challenge #23 - Anything Goes
ABC Challenge  - Oct 1-14th  - W for Words


Glowing Candles


Hello, my crafting friends! This card is 5x5 inches. The base was created by die cutting 2 separate layers with the largest die from Marianne Creatables Anja's Squares. One of the layers was then scored about 1/2 inch from one edge and then adhered to the edge of the other layer. The card would then open by lifting up the top layer. 

Next, I cut a panel in red using the second die from the same Marianne Creatables die set and adhered it to the base card. Then, using Spellbinders Adorning Squares, a white panel was cut which would contain the focal point.

The candles, from Memory Box Glowing Candles die, were cut three times: once in red, once in gold and a third time in green. These were then paper pieced to get the above look and popped on. The sentiment is from GKD's The Magic of Christmas stamp set and was stamped in Versamark and embossed with red EP.

Paper piecing the glowing candles was a lot of work but well worth the effort in the long run. Here is a video tutorial by Pam Sparks on how it was done: Glowing Candles. Hope you get a chance to check it out.


This card was entered into the following challenge(s):
613 Avenue Create  -  Challenge #40 - Anything Goes
Word Art Wednesday  -  Challenge #101 - Anything Goes
Sister Act  - Challenge #28 - Anything Goes
Oozak  -  Challenge #23 - Anything Goes


Saturday, October 5, 2013

Happy Holidays Village


Hello everyone! We are having some beautiful fall weather here in my neighborhood and it's not easy trying to think "winter" in the midst of all this warmth. 

But here's another Christmas card I made and just looking at it makes me feel cold. I decided on a green card base. Next I die cut a white layer with a Spellbinders Detailed Scalloped die. I cut out the  center with Spellbinders 5x7  Matting Basics A die which left me with an open frame. Then I embossed another white layer with Marianne Designables Anja's Flower EF and framed it with the scalloped layer. 

For my focal point, I die cut an oval with Marianne Creatables Small Ovals by Petra, added glitter and popped it onto the framed panel with dimensionals. Next I stamped Poppy Stamps Holiday Village in Versamark on white card stock and then embossed it with gold EP. After this I colored the trees and houses with Copic markers, cut out the image with the co-ordianting Poppy Stamps Holiday Village die and popped in onto the glittered oval. 

The sentiment was computer generated, cut out with Spellbinders Ribbon Banners and sponged while still in the die. As the final step, the sentiment banner was adhered to the oval. 

Although it's not entirely visible, the glitter really makes this card sparkle like glistening snow. And we'll be seeing Mother Nature's real life winter beauty in just a few short months.


This card was entered into the following challenge(s):
Word Art Wednesday  - Challenge #100 - Anything Goes
Crafty Catz  -  Challenge #201 - Anything Goes
Speedy Fox & Friends  -  Challenge #180 - Winter Scene
Marianne Designs Divas  -  Anything Goes

Friday, October 4, 2013

White Christmas


I'm dreaming of a white Christmas......and it's only the early part of October! In my opinion, there's nothing like Christmas Day covered with a white blanket of snow.
 
I wanted to make a white on white card and this is what I came up with. My base card measures 5 1/4 x 5 1/4". I embossed a slightly smaller layer with a Nellie Snellen Christmas Square-1 embossing folder and adhered it to the base. The tree was cut with Marianne Creatables Christmas Tree die, glitter added and popped onto the embossed layer with dimensionals. The little poinsettias, which I just love, were cut in red with Poppy Stamps Small Blooming Poinsettia die. A dot of Stickles was added to the centers and then the flowers were adhered to the tree. The sentiment was computer generated and then cut with a Spellbinders Ribbon Banners die and popped on.

I really love this card and I hope you like it too. Until next time, make it a wonderful day!
 

This card was entered into the following challenge(s):
Sister Act  -  Challenge #27 - Anything Goes
613 Avenue Create  -  Challenge #39 - Anything Goes
Word Art Wednesday  - Challenge #100 - Anything Goes
The Outlawz  -  GCC 0930 - Anything Goes
Crafty Catz   -  Challenge #201 - Anything Goes
2 Sisters Challenge Blog  -  Challenge #163 - Anything Goes


Wednesday, October 2, 2013

Christmas Blessings


I just love the traditional Christmas colors: red, green and white. I find them to be so festive and cheerful....and oh so Christmassy!

So here is another Christmas card I made using the traditional colors. I started with a 5x5" base card in white. I added a red layer. Next, I embossed a white layer with a Darice Stripe Background EF and adhered it to the red layer. I cut a panel from red card stock using one of the dies from Spellbinders Marvelous Squares and stamped the sentiment (PTI Signature Christmas) in Versamark and then embossed it with gold EP. This was then adhered to the white layer.

The poinsettia flowers (HFC Christmas Poinsettia) were stamped on red card stock with Versamark, embossed in gold and then cut with HFC Sun Kissed Fleur die. I layered the different size flowers to create the completed poinsettia and adhered it to the lower left corner of the red panel. Finally, I cut some pine sprigs in green card stock with Poppy Stamps Pine Sprigs dies and adhered them to the poinsettia.

As much as I love the traditional colors of Christmas, I plan to make other cards using other colors. But time and time again, I come back to the reds and greens.

Hope you enjoyed this post and will create today!


This card was entered into the following challenge(s):
TTCRD - Oct 1-7 Challenge - Anything Goes
Word Art Wednesday - Challenge #100 - Anything Goes
Sister Act  -  Challenge #26  -  Anything Goes
613 Avenue Create  -  Challenge #39 - Anything Goes
The Outlawz - GCC 0930 - Anything Goes
2 Sisters Challenge Blog  - Challenge #163 - Anything Goes


Tuesday, October 1, 2013

Poinsettia on Mexican Tile Pattern


This card was inspired by one I saw on the Internet. I wasn't sure how it would turn out but I was very pleased with the end result. 

This is a 5x5" square card with a white card base. The red square patterned frame was created with a Cheery Lynn Mexican Tile Pattern die and adhered to the base. I added a white square panel in the center and stamped the sentiment (from GKD's The Magic of Christmas) on all four edges in Versamark and then embossed each with red EP.

For the poinsettia, I stamped a HFC Christmas Poinsettia background stamp on red card stock, embossed it with gold EP and used the HFC Sun Kissed Fleur die to cut out the individual flowers. After shaping each petal and layering and adhering the individual flowers one on top of the other, I adhered the finished poinsettia to the center. The leaves were punched with a MS leaf punch.

Hope you liked it and will be inspired to create your holiday cards. Remember.....there are only 84 days left til Christmas!

This card was entered into the following challenge(s):
TTCRD - Oct 1-7 Challenge - Anything Goes
Word Art Wednesday - Challenge #99 - Anything Goes
Sister Act  -  Challenge #26  -  Anything Goes
613 Avenue Create  -  Challenge #39 - Anything Goes
The Outlawz - GCC 0930 - Anything Goes
2 Sisters Challenge Blog  - Challenge #163 - Anything Goes