Saturday, May 11, 2013

Hello! Welcome to my blog and thank you for stopping by. I design and create handcrafted greeting cards. I like to call this passion of mine "visual poetry" ....imagery on paper. Please feel free to browse the photos of my cards and leave a comment.

Sunday, May 27, 2018

First Holy Communion


Hello, friends and crafters!  This is the time of year for First Communion and Graduation events.  Here are the cards I made for my friend's grandchildren who received their first holy communion.  I made the young boy's card a little different so as to differentiate from the girls' cards.

I wanted an image of a chalice on the front of the card but could not find any chalice dies.  I found a template on line and created the chalice from GKD Pure Luxury white card stock. I added an embossed edge to the chalice using a die from Crafter's Companion Opulent Swirls and a gold cross from Sassy Stamps Lacey Eyelet Border #2. The wheat heads were die cut from a Cheery Lynn die and the grapes from a Frantic Stamper die These were put aside to work on my front panel and layers.

For the girls' cards I cut the oval using Spellbinders Elegant Ovals.  While still in the die I sponged around the oval using Memento Summer Sky ink. For the boy's focal panel I used a die from Spellbinders Romantic Rectangles and also sponged around the perimeter using the same ink. The sentiment was computer generated on all 3 cards.

The embossed layer on the girls' cards was created with a Couture Creations Tied Together EF. The base card was made using GKD Pure Luxury white card stock and the blue layer is from Stampin' Up Spring Rain card stock.

The cards were then assembled using foam layers on the focal panel to give the die cut images some dimension. This completed my project. 

Thank you for visiting my blog.  Comments are always welcome and most appreciated.  Stop by again real soon!


Tuesday, May 1, 2018

Handy Man Birthday


Hi, everyone!  My brother is quite the handy man. When we were growing up he was always at my dad's side, helping him when there was repairing or building to be done. He learned to do things at a young age which later proved beneficial in adulthood.  Today he has built things for his family or repaired things that needed to be repaired. I just wish he lived near by so I could hire him for things that I need done around my home.  But alas, he and his family reside in Georgia.

So....I decided to make this card for him for his upcoming birthday.

In my garage I have a pegboard with garden tools on it. I wanted to design a card with a realistic looking pegboard filled with workshop tools. The above card is what I came up with. All the dies used in this project, with the exception of the banner with the sentiment,  are from Our Daily Bread Designs.

I began with creating the pegboard in GKD Pure Luxury White card stock and matted it with GKD Black Onyx card stock. Next, I die cut the tools in silver mirror paper and then paper pieced the tool handles with GKD Cherry Red card stock.  The tools were then attached to the peg board and die cut hooks were added to give it a realistic look.

The sentiment was composed and then computer generated and die cut with a die from Avery Elle Dotted Elle-Ments die set. Die cut nails were added as a final touch.

After my themed focal panel was completed, the base card was created using GKD Pure Luxury White card stock. This was layered with GKD Black onyx card stock. The background layer for the focal point was wood panel digital paper from my stash.  The final step was to adhere the pegboard and sentiment banner and the job was done.

I hope you liked this card and enjoyed this post. Thanks for visiting and please come back often. In the meantime,  make it a great day!

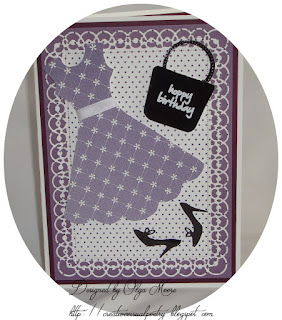
Dress-Up Birthday


Hello crafters!  This card was made for a "friend" that I've never met in person. When I was still working, this lady worked in a different state with whom I had frequent contact. In my job I had contacts in every state. This particular lady and I became friends over the years through work-related telephone calls. Even after we both retired we kept in touch with phone calls and cards, but we have never met in real life.  Hence the yearly birthday cards and phone calls.

I began with using a dress template to cut out the dress in some patterned paper that I had.  I added a white satin ribbon at the waist.  Next, I created the purse body in black mirror paper using an image that I found on line and tweaked it. The purse handle was made using 2 circle dies (one larger, one smaller) and then adhered to the back of the purse. The "happy birthday" was stamped with Versamark and then embossed with white EP.  The shoes were die cut in black mirror paper using a die from Impression Obsession Wedding Icons. I put all this aside to work on the base card and layers.

The base card was created in white using GKD Pure Luxury card stock. A layer of SU Blackberry Bliss card stock was added followed by a layer of SU Wisteria Wonder. For the background of the focal point, I die cut a panel of dotted swiss patterned paper using the largest die from Spellbinders 5x7 Detailed Scallops die set.

After adhering all the layers, the dress, purse and shoe images were popped on with dimensionals. This completed my project. I was very happy with the final result.

Thanks for stopping by!  Until next time, make it a great "crafting" day!