Saturday, May 11, 2013

Hello! Welcome to my blog and thank you for stopping by. I design and create handcrafted greeting cards. I like to call this passion of mine "visual poetry" ....imagery on paper. Please feel free to browse the photos of my cards and leave a comment.

Monday, October 8, 2018

Floral Wreath Birthday


Hello everyone! This card was made for a friend and former co-worker. 

The card front was created first by scoring 3 lines at the top and bottom of the panel on ivory card stock. Next, the wreath die was used to cut out 2 twig wreaths in Kraft card stock and then colored with Vintage Photo ink and adhered together.  Several flowers were die cut in white card stock and then colored with Spiced Marmalade using mini applicators.  The center of the flowers was colored with Vintage Photo ink. After coloring, Wink of Stella was applied to each flower. The leaf branches were die cut in Fresh Asparagus card stock.

After all the elements were die cut, it was time to assemble the wreath. With dimensionals, the wreath was adhered to the front panel. Next, the flowers were randomly attached with glue dots. Finally the leaves were inserted behind the flowers and attached with adhesive.

The card base was created in ivory card stock and layered with Sweet Mango. The completed card front was adhered to the base card with dimensionals. As a final step, the greeting was computer generated and then die cut with the smallest die from the Nesting Postage Stamps set.  This completed my project.

Here are the products used in this project:

Card Stock  -  GKD Pure Luxury Ivory, Sweet Mango, Kraft, Fresh Asparagus, White.
Dies  -  IO Twig Wreath, IO Spring Wreath, Poppy Stamps Lorelei Leaf, Hero Arts Nesting Postage                 Stamp
Inks  -  Distress Oxide Spiced Marmalade, Vintage Photo
Other  -  scoring tool, adhesive, dimensionals, mini applicators, glue dots.

I love how simple yet so very appealing this card turned out.  I hope it inspired you to create.

Thanks for stopping by.  I'll be back soon with another wreath card. 
Until then, make it a great day!


Tuesday, September 25, 2018

Autum Leaf Wreath Birthday


Hello fellow crafters!  Anyone that knows me knows that I love fall. It is my favorite season. Maybe it's because I was born in the fall. I love the crispness of the air and nature's colorful palette in the leaves.

One of my college roommate's birthdays falls in the same month as mine and just 4 days apart. This card was made for her.

In my first step I created the wreath by cutting branches from an IO Wide Tree die in GKD Kraft card stop and colored it with Distress Oxide Vintage Photo ink.  The base for the wreath was prepared by die cutting a smaller circle inside a larger circle resulting in a large "O". The die cut tree branches were then adhered to the base circle until it was completely covered. 

Next, using the dies from an IO Small Leaf  set  (5 leaf dies), each leaf was cut several times from differed colored card stock  (fall colors).  I applied Inka Gold to the leaves using a mini applicator to give them some interest and shine.  The leaves were then randomly adhered to the wreath with glue dots and dimensionals.

The base card was created in GKD  Pure Luxury Ivory card stock. A wide strip of ivory card stock was embossed with a Sizzix Corrugated EF and then matted with GKD  Sweet Mango  and Chocolate Brown card stock. This was then adhered to the card base with foam tape.  As a final step, the sentiment was stamped with Memento Tuxedo Black ink from GKD Country Roads 2 stamp set and a brown bow was added to the wreath for a finishing touch.

Thanks for stopping by today!  Until next time, have a great week


Friday, September 21, 2018

Wedding Shaker Card


Another wedding card to share. This one was requested by a very lovely lady, that I've only met through emails, whose grandson is getting married. I've made several cards for her in the past. This turned out to be a very large card....a little over 8 inches high and 6 inches wide. 

I began by die cutting the heart wreath twice and adhering the two together. I temporarily positioned the wreath on my front card panel to determine where to print the sentiment and names of the bride and groom. Then these were computer generated.  Next, once again positioning the wreath temporarily on the card, I determined where to place  the champagne glass dies in order to create the negative space that would hold the shaker elements. After die cutting space for the glasses, the wreath was permanently adhered to the panel. The part of the wreath that overlapped the champagne glasses was cut out.  This gave the appearance that the wreath was behind the glasses.

Now it was time to prepare the shaker elements.  I cut a piece of acetate and adhered it behind the cut out glasses.  Next, I added foam tape around the portion of the glasses that would house the shaker elements. Then, and very carefully, I added the little glitter heart shapes. As a last step in creating the front panel of the shaker card, using dimensional tape, I covered the back with a piece of card stock just a bit smaller than the panel itself.

I prepared the base card, slightly larger, and adhered the focal panel to the base. I added some die cut bows and small overlapping hearts to complete the look. My project was complete.


Here are the products used in this project:

Card Stock  -  Shimmering Ivory, GKD Ivory (for the inside message)
Dies  -  Memory Box Bingham Heart, Sizzix Framelits Scalloped Hearts, Die-Namics Layered                                  Champagne Glass
Other  -  Reflections Glitter Shapes, adhesive, dimensionals

Thank you for stopping by. Hoping you were inspired to create. 
Until next time,  Happy Crafting!


Tuesday, September 18, 2018

Wedding Couple Under Arch


Hello!  I have had to make several wedding cards this year for fall. Here is one I made for a friend and former co-worker whose son was recently married. I was invited to the out-of-town wedding, however, I was unable to attend due to a prior commitment but wanted to send a card.  

I began with creating my base card in GKD Lil Boy Blue card stock.  I added die cut layer in GKD Pure Luxury White card stock cut with a die from Spellbinder's 5x7 Detailed Scallops set. At this point, I used the arch die as a guide and sponged Memento Summer Sky in the center of the white die cut panel before die cutting the arch (Tattered Lace Blossoming Arch).

The arch was cut in GKD Pure Luxury White card stock and adhered to the card with dimensionals. Next, flower petals were cut in white card stock using Leane Creatief Small Flowers and Leaves die set and randomly attached to the arch. Blue pearls were added to the flower centers.

The bride and groom image was cut in GKD Pure Luxury White and Black Onyx card stock and adhered with dimensionals. Tiny pearls were added to the crown of the bride's head and also on her gown. The card was complete.

Thanks for visiting my blog. Please stop by often and feel free to leave comments, which are much appreciated.
Until your next visit, happy creating!


Thursday, August 30, 2018

Beer Bottle Birthday


Hello everyone!  Masculine cards are always a challenge for me. I have 3 men in my life for whom I make birthday cards. Coming up with 3 different ideas each year is not easy. I try to make them as personal as possible and sometimes it takes days to finally come up with a theme that I feel is the perfect one.  Here is a birthday card that I made for one of my nephews whose birthday fell in August.

I began by creating the beer crate. This was done by taking kraft card stock, scoring it in 1/2" intervals and then running a brown ink pad over it to create the effect of wood. Next, this panel of card stock was cut into 4 strips along the score lines.  A strip of card stock was adhered vertically at both the left and right ends of the crate in order that the slats could be attached with brads. This was put aside.

My next step was to create the beer bottles. These were die cut in brown card stock and then crystal lacquer was applied to give the appearance of glass. The bottle caps were die cut in a golden pearl card stock and adhered to the tops of the bottles. (I created labels for the beer bottles, using the name of the most popular beer in my nephew's city). The 6 beer bottles were then attached to the crate with dimensionals, offsetting the ones in the rear of the crate.  This was also put aside.

The beer glass was die cut in a golden pearl card stock. Since the beer glass had cut-outs in the front, I had to mat it with colored paper to give the appearance that it was filled with beer. And to make it look really REAL, foam was added to the of of the beer glass using a snow maker.

Finally, the base card was prepared in brown card stock, layered with kraft, followed by ivory and brown plaid digital paper. The beer crate and glass were then adhered to the card front. The sentiments were die cut in the golden pearl card stock and adhered as shown.

This completed my project.  It took a lot of work but I was very pleased with the way it turned out. 

Here is a list of the products used in this project:

Card stock:  PTI Dark Chocolate, GKD Kraft, GKD Ivory, Golden Pearl (unknown)
Dies:  Frantic Stamper Soda/Beer Bottle and Can die set, Trim Craft Food and Drink die set, Sue Wilson's A Little Birdie Told Me, Crafter's Companion Simple Sentiments
Other:  digital paper, brads, Marvy Snow Marker, 3D Crystal Lacquer, adhesive, dimensionals


Thanks for visiting my blog. Any comments would be very much appreciated. 
Until next time, make it  great day!


Sunday, August 19, 2018

Coffee Cup Pop-Up Birthday


Hello fellow crafters!  My daughter, who just LOVES coffee, had a birthday this month. I decided to use coffee as my theme for the card I made for her.  When the card is opened flat, up pops up a coffee cup.

The products used in this project:

Card Stock:  GKD Pure Luxury White, Blue Denim
Stamps:  GKD Fabulous Frame Fillers
Dies:  Spellbinders Triple Floral, Elizabeth Crafts Cup Pop Stand, IO Coffee Set, Cottage Cutz Stitched Oval
Inks:  GKD Blue Denim
Other:  digital paper, adhesive, dimensionals, sentiment composed and computer generated, crown image computer generated.

I began by working on the pop up cup on the inside of the card. Here is a link to a video tutorial in lieu of providing directions.

After completing the inside, I worked on the front of the card. First, I die cut my frame and adhered it to the base card. Next I added a layer for the background using digital paper from my stash. The coffee pot and cup were die cut and then stamped with the floral image.  I added a strip of matching digital paper to the top and bottom of the coffee pot and a small piece of brown card stock was adhered behind the coffee cup to make it appear as if the cup was filled with coffee.  These were then popped on with dimensionals. My sentiment was printed on white card stock, computer generated and then die cut and adhered to the card.

Thanks for stopping by. Hope this post gave you inspiration to create.
 Until next time, have a creative day!


Thursday, July 19, 2018

Birthday Birdhouse


This card was created for my sister-in-law who recently celebrated a milestone birthday. I'll be visiting my brother and sister-in-law in the fall for my older nephew's wedding. Looking forward to the wedding and spending a few days with my family.

I think the photo self-explains the assembly so I won't go into detail on that but will list the materials and products used in this project:

Card Stock:  GKD Pure Luxury White, Kraft,  PTI Spring Rain and Chocolate Brown
Dies:  Sue Wilson Double Pierced Rectangles, Chloe die, Home Tweet Home die set, and A Little Birdie Told Me die set
Ink:  Memento Rich Cocoa
Other: adhesive, dimensionals, sponge daubers

Thanks so much for stopping by. Until next time, happy crafting!


Saturday, June 30, 2018

Graduation Card


It's that time of year for graduations. The granddaughter of my dearest friend (who has been blessed with 10 grandchildren) just graduated from high school.  Her parents gave her a graduation pool party and this is the card I made for her. 

I began with creating the focal panel by embossing white card stock with a Taylored Expressions Bead Board EF.  Next I die cut my images: the sentiment from Sue Wilson Congrats die, the cap and diploma from Cheery Lynn's Graduation Set die, and the books from Frantic Stamper's Stack of Books die.

I die cut the cap from red card stock and paper pieced the tassel with GKD Good as Gold card stock (since those were the colors of the graduate's high school). For the diploma, that was cut from white card stock and the ribbon was paper pieced with the same gold as the tassel. The stack of books took the most work. They were first die cut from Gold Pearl Linen card stock and then each book cover was paper pieced with various colored card stock. These were then put aside in order to assemble the card.

For the base card, the front was embossed with a die from Sue Wilson's Double Stitched Rectangle die. Next, a layer of red card stock was adhered to the base. The front panel was then adhered to the red layer. The Congrats die cut was attached with adhesive. The cap, diploma and books were adhered with dimensionals. This completed by project.

I hope you enjoyed with post and got inspired to create. 
 Thanks for stopping by and come by again real soon. 

Sunday, May 27, 2018

First Holy Communion


Hello, friends and crafters!  This is the time of year for First Communion and Graduation events.  Here are the cards I made for my friend's grandchildren who received their first holy communion.  I made the young boy's card a little different so as to differentiate from the girls' cards.

I wanted an image of a chalice on the front of the card but could not find any chalice dies.  I found a template on line and created the chalice from GKD Pure Luxury white card stock. I added an embossed edge to the chalice using a die from Crafter's Companion Opulent Swirls and a gold cross from Sassy Stamps Lacey Eyelet Border #2. The wheat heads were die cut from a Cheery Lynn die and the grapes from a Frantic Stamper die These were put aside to work on my front panel and layers.

For the girls' cards I cut the oval using Spellbinders Elegant Ovals.  While still in the die I sponged around the oval using Memento Summer Sky ink. For the boy's focal panel I used a die from Spellbinders Romantic Rectangles and also sponged around the perimeter using the same ink. The sentiment was computer generated on all 3 cards.

The embossed layer on the girls' cards was created with a Couture Creations Tied Together EF. The base card was made using GKD Pure Luxury white card stock and the blue layer is from Stampin' Up Spring Rain card stock.

The cards were then assembled using foam layers on the focal panel to give the die cut images some dimension. This completed my project. 

Thank you for visiting my blog.  Comments are always welcome and most appreciated.  Stop by again real soon!


Tuesday, May 1, 2018

Handy Man Birthday


Hi, everyone!  My brother is quite the handy man. When we were growing up he was always at my dad's side, helping him when there was repairing or building to be done. He learned to do things at a young age which later proved beneficial in adulthood.  Today he has built things for his family or repaired things that needed to be repaired. I just wish he lived near by so I could hire him for things that I need done around my home.  But alas, he and his family reside in Georgia.

So....I decided to make this card for him for his upcoming birthday.

In my garage I have a pegboard with garden tools on it. I wanted to design a card with a realistic looking pegboard filled with workshop tools. The above card is what I came up with. All the dies used in this project, with the exception of the banner with the sentiment,  are from Our Daily Bread Designs.

I began with creating the pegboard in GKD Pure Luxury White card stock and matted it with GKD Black Onyx card stock. Next, I die cut the tools in silver mirror paper and then paper pieced the tool handles with GKD Cherry Red card stock.  The tools were then attached to the peg board and die cut hooks were added to give it a realistic look.

The sentiment was composed and then computer generated and die cut with a die from Avery Elle Dotted Elle-Ments die set. Die cut nails were added as a final touch.

After my themed focal panel was completed, the base card was created using GKD Pure Luxury White card stock. This was layered with GKD Black onyx card stock. The background layer for the focal point was wood panel digital paper from my stash.  The final step was to adhere the pegboard and sentiment banner and the job was done.

I hope you liked this card and enjoyed this post. Thanks for visiting and please come back often. In the meantime,  make it a great day!

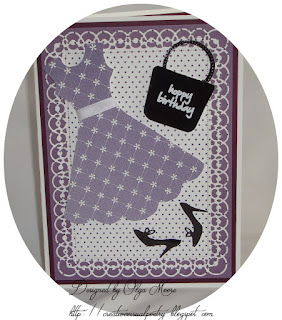
Dress-Up Birthday


Hello crafters!  This card was made for a "friend" that I've never met in person. When I was still working, this lady worked in a different state with whom I had frequent contact. In my job I had contacts in every state. This particular lady and I became friends over the years through work-related telephone calls. Even after we both retired we kept in touch with phone calls and cards, but we have never met in real life.  Hence the yearly birthday cards and phone calls.

I began with using a dress template to cut out the dress in some patterned paper that I had.  I added a white satin ribbon at the waist.  Next, I created the purse body in black mirror paper using an image that I found on line and tweaked it. The purse handle was made using 2 circle dies (one larger, one smaller) and then adhered to the back of the purse. The "happy birthday" was stamped with Versamark and then embossed with white EP.  The shoes were die cut in black mirror paper using a die from Impression Obsession Wedding Icons. I put all this aside to work on the base card and layers.

The base card was created in white using GKD Pure Luxury card stock. A layer of SU Blackberry Bliss card stock was added followed by a layer of SU Wisteria Wonder. For the background of the focal point, I die cut a panel of dotted swiss patterned paper using the largest die from Spellbinders 5x7 Detailed Scallops die set.

After adhering all the layers, the dress, purse and shoe images were popped on with dimensionals. This completed my project. I was very happy with the final result.

Thanks for stopping by!  Until next time, make it a great "crafting" day!

Saturday, March 17, 2018

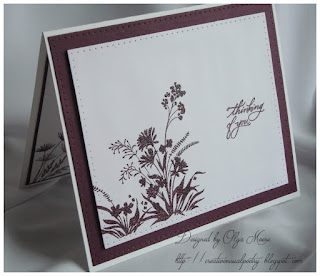
Thinking of You Poppies


Hello!  I have two friends who have been going through difficult times. One is recovering from 3rd degree burns and the other is going through chemo due to cancer. I made these cards to send to them in hopes that they will bring a little cheerfulness into their lives.

The stamp set I used in this project is from Hero Arts called Poppy.  This is a layering stamp set which contains 3 layers for the poppy flower plus the poppy center or the stamen and stems and buds. The set contains stamps of 2 sizes of poppies.

I began by stamping the first or bottom layer of the large poppy with a light color ink on white card stock. This was followed by stamping the second layer in a mid tone ink. The third layer was stamped with a dark ink. I did the same with the smaller poppy stamps. The stamen was stamped with black ink and the stems and buds with a green ink. The sentiment, which was included in the same set, was stamped with black ink.

After coloring my images, I matted the panel with black card stock and adhered this to a white card base.   This completed my project.

The poppy images appeared to be so soft and soothing to me that I felt they would make wonderful get well or thinking of you cards. I was happy with the results.

Thank you for stopping by! Please come again and perhaps get inspired to create.
 Until next time, make it a great day!

Sunday, February 11, 2018

Birthday Cake 3 Sectional Card

Front section of card


As the card is opened, the flap is exposed

The card as it stands upright exposing the flap section.

The card exposing the middle section containing the verse, the flap laying down.


Hello fellow crafters!  Here's a card I made for a friend's birthday.  I call it a 3 sectional card because it has 3 sections: the front of the card is one section, the middle is the second section and the flap is the third section. 

The card is created by taking an 8 1/2  x 11-inch piece of card stock and scoring it at 5 1/2 inches. on the 11" side. Next, 1/8 " needs to be cut off at the 8 1/2" end.  Then, the card stock is cut in half lengthwise at 4 1/4", ending up with 2 pieces of card stock, sized 4 1/4" by 5 3/8".

The front section with the window and the flap sections are decorated prior to assembling the card. The middle section, which will contain the verse, can be done after the card is assembled by creating the verse on a separate piece of card stock and then adhering it to the middle section. 

After decorating the 2 sections, place both card bases down with the fronts facing you. Leave the first card with the front facing up and turn the second card so that the shorter side faces up. Next, open the second card and adhere its shorter side to the back of the first card, making sure that the tops of the card are aligned. After adhering, the card will have 3 panels with 2 folds. It's similar to a gatefold card except 2 pieces of card stock are used to create it.  Here's a sample diagram of what the card would like when completely opened up:


I hope this helps explain how the card is assembled. Here are the products used to create this card:

Card Stock:  GKD Pure Luxury White, Innocent Pink, Grass Green; PTI Blushing Bride
Stamps:  SU Cake Soiree Stamp Set
Dies:  SU Sweet Cakes Framelits, Crafter's Companion Simple Sentiments
Ink:  GKD Innocent Pink, SU Mossy Meadow, Versafine Onyx Black
Other:   adhesive, dimensionals


Thanks for stopping by!  Please feel free to leave any comments. 
 Until next time,  happy stamping!


Saturday, February 3, 2018

Thinking of You in Blackberry Floral


This card was made for a friend and former co-worker who has been affected with cancer. It is always hard to know what to say to someone who is angry, in disbelief, afraid and feels alone when cancer strikes. I feel words of encouragement are the best way to help someone get through those painful and difficult times. So that is what I chose to do in my inside message to my friend.

If interested, I am listing below the products used in creating this card:

Card Stock  -  GKD Pure Luxury White, SU Blackberry Bliss

Ink  -  SU Blackberry Bliss

Stamps  -  GKD Wild Blossom,  Chocolate Baroque Thinking of You Sentiments, (for inside of          card:  GKD You're My Favorite, Handmade Botanicals)

Dies  -  Sue Wilson Double Pierced Rectangles Set B

Other  -  Clear EF, adhesive, dimensionals


Please remember to keep in your prayers those that are suffering from any serious illnesses. 
And thank you for visiting.  Until next time, get creative!

Thursday, February 1, 2018

70th Birthday


       Reaching 70 years of age is a milestone. Lots of memories to share and reminisce. 
And in celsius, 70 is 21!  

My dearest friend turned 70 recently. We have been friends for almost a century. Well.....not quite. So, I wanted to make a very special card for her. After searching to find just the right one, I came across one that I loved and decided to make a very similar one.

Here are the supplies used to create this card:

Card Stock  -  GKD Pure Luxury White, Orange Zest, Sweet Mango, Gold
Die Cuts  -  Marianne Designs pumps, champagne glass, Anja's Vintage Swirls, Spellbinders 5 x 7 Detailed Scallops, Memory Box Floral Delights, ProvoCraft Numbers
Embossing Folder - Sue Wilson Beaded Quilted Circles
Other  -  adhesives, dimensionals,  Nuovo Pale Gold Crystal Drops, tiny white pearls

The sentiment was computer generated. All images were popped on with dimensionals.

Thank you for visiting! Please feel free to leave any comments. I would love to hear what you think of this card.  Until next time, get inspired and create!


Football Birthday


Hello! My older nephew is a big fan of the Georgia Tech college football team. So I decided to incorporate that theme into his birthday card. He turned 35. And, by the way, his initials are GT.  How cool is that?

Here are the products I used to create this card:

Card Stock  -  GKD Pure Luxury Ivory, In the Navy, Grass Green,  Good as Gold Metallic
Dies  -  Quickutz Large Football, Little B Sports Dies, ProvoCraft Numbers Dies, Avery Elle Dotted Elle-Ments
Embossing Folder -  Creative Expressions Textured Linen, Cuttlebug Tiny Bubbles
Other  - adhesive, dimensionals,

The textured linen embossing folder was used to create the background (playing field).  Thin strips of ivory card stock were cut to create the goal posts and then adhered to the "playing field" with dimensionals. The large football, embossed with the tiny bubbles EF, was die cut in navy and in gold and then assembled. The helmet was also die cut in navy and gold and then paper pieced. The sentiment and "GT" initials on the helmet were computer generated.

I was very pleased with the end result.  I have 3 men in my family that I send birthday cards to each year. Masculine cards are always a challenge and I find myself trying to come up with 3 different themes each year. But it's always fun searching ideas until that light bulb in my head lights up.  LOL

Thanks so much for stopping by and please come by often.
 Until next time, make it a great day!


Wednesday, January 10, 2018

Sweet Baby Girl Cards

Hello! And Happy New Year!

I received a request to make a "baby girl" card.  I was on a roll and couldn't stop at just one card. So I ended up making 5 that the requester could choose from.  And here they are......


I thoroughly enjoyed making these, loving each new one more than the one before it. I do have a favorite, though, and I hope my client chooses that one.

Until next time, make it a great crafting day!