Saturday, May 11, 2013

Hello! Welcome to my blog and thank you for stopping by. I design and create handcrafted greeting cards. I like to call this passion of mine "visual poetry" ....imagery on paper. Please feel free to browse the photos of my cards and leave a comment.

Sunday, October 13, 2013

Christmas Elegance in Gold


Using gold in card making is ever so elegant, especially at Christmas time when creating cards for friends and family. Here is the card I made with that thought in mind.

For my base I used gold card stock and created a 5 1/2 x 5 1/2 base card. In the next step I cut a 5x5 inch panel in white. Using one of the Spellbinder Heirloom Ornament 2011 dies I cut out the die shape in the middle of that panel. This panel was then embossed with a Nellie Snellen Christmas Round-1 embossing folder.

I prepared another white panel, just slightly smaller than the embossed one and adhered it to the base card. Next, I die cut an ornament using the Memory Box Snowflake Ornament die and embossed it in gold. The bow was cut with a die from Memory Box Crisp Bows and also embossed in gold. I cut off the bottom part of the bow. The gold embossed ornament was adhered to the white panel. The embossed panel was popped onto the white panel, the gold ornament showing through the cut out, and the bow adhered at the top.

For the sentiment, I stamped it in Versamark using GKD's Sentimental Holiday stamp set and embossed it in gold. Then it was cut with one of the dies from Spellbinders Grommet Tags. To give the card a finished look, I cut some pine sprigs with Impressions Obsession Pine Sprigs Cluster dies, embossed them in gold and attached them to the sentiment tag.

I hope you enjoyed this post and are well on your way to creating your Christmas cards. It won't be long before the snow flies!


This card was entered into the following challenge(s):
2 Sisters Challenge Blog  -  Challenge #165 - Anything Goes
Word Art Wednesday  -  Challenge #101 - Anything Goes
Sister Act  -  Challenge #28 - Anything Goes
613 Avenue Create  -  Challenge #41 - Anything Goes

Friday, October 11, 2013

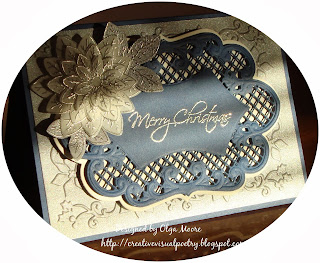
Silver Christmas


In making this card, I decided to use some not-so-traditional colors. I chose denim blue, silver and white. I started out with a base card in denim blue. Next, I embossed a silver layer with a Sizzix Peace Poinsettia folder and adhered it to my base card.

For the focal point of my card I started with a white scalloped oval cut from Marianne Creatables Anja's Large Ovals die. Next, I cut a lattice scalloped oval in blue denim using another of the dies from the same set. My sentiment (Stampabilities) was stamped in Versamark and embossed with silver EP. The completed panel was then popped onto the base with dimensionals.

The poinsettia was made by stamping an HFC Christmas Poinsettia background stamp on vellum, embossing the flowers with silver EP and then cutting them out with an HFC Sun Kissed Fleur die. The cut poinsettia petals were layered and then adhered to the card.

And this completed my project. Until next time, make it a creative day!


This card was entered into the following challenge(s):
613 Avenue Create  - Challenge #40 - Anything Goes
Sister Act  - Challenge #28 - Anything Goes
TTCRD  -  Oct 8 Challenge - Anything Goes
Word Art Wednesday  -  Challenge #101 - Anything Goes
Oozak  -  Challenge #23 - Anything Goes

Believe


Hello! Seventy five days to go before Christmas gets here. Although I enjoy the "spookiness" of Halloween and the "feasting" on Thanksgiving, Christmas is by far my most favorite holiday. I love to dress up the inside of my home with a  beautifully lit tree, Christmas villages, candles, pine branches, etc. I don't dress up the outside except for a lit wreath on my door. And on a snowy night, when all the homes are lit up, it is absolutely gorgeous!

Here I am talking about snow when we've had some beautiful weather and there's more to come. But I've zoomed in on Christmas and finding it easier and easier to make my Christmas cards.

Here is one of the cards I made today. It starts out with a white base. On another piece of white card stock layer I created an embossed frame with Spellbinders 5x7 Matting Basics A die. On the bottom edge of this layer I stamped my sentiment (from HFC Holly Berry stamp set) in black ink and embossed it with clear EP. This layer was then matted with red and adhered to the base. 

For my wreath I first created a base (a ring) to which to attach the pine sprigs. The base was made with green card stock using two Spellbinders Standard Circle dies, one inside the other to create a ring. Next I cut many pine branches in the same green card stock using Poppy Stamps Pine Sprigs dies. Then, one by one, I adhered the pine branches around the circle to create the wreath.

I cut a circular frame from Marianne Craftables Tiny Hearts die in white card stock. Next, I cut a lattice oval using a die from Marianne Creatables Anja's Vintage Frame and adhered this to the back of the circular frame. The wreath was then adhered to the completed frame and popped on to the card with dimensionals. For the final touch I added red Stickles to imitate berries and a tiny red bow.

Hope you enjoyed this post! Thanks for stopping by.

This card was entered into the following challenge(s):
Word Art Wednesday  -   Challenge #101 - Anything Goes
613 Avenue Create  -   Challenge #40 - Anything Goes
TTCRD  -  Oct 8 - Anything Goes
Sister Act  -  Challenge #28 - Anything Goes
Oozak  - Challenge #23 - Anything Goes
ABC Challenge  - Oct 1-14th  - W for Words


Glowing Candles


Hello, my crafting friends! This card is 5x5 inches. The base was created by die cutting 2 separate layers with the largest die from Marianne Creatables Anja's Squares. One of the layers was then scored about 1/2 inch from one edge and then adhered to the edge of the other layer. The card would then open by lifting up the top layer. 

Next, I cut a panel in red using the second die from the same Marianne Creatables die set and adhered it to the base card. Then, using Spellbinders Adorning Squares, a white panel was cut which would contain the focal point.

The candles, from Memory Box Glowing Candles die, were cut three times: once in red, once in gold and a third time in green. These were then paper pieced to get the above look and popped on. The sentiment is from GKD's The Magic of Christmas stamp set and was stamped in Versamark and embossed with red EP.

Paper piecing the glowing candles was a lot of work but well worth the effort in the long run. Here is a video tutorial by Pam Sparks on how it was done: Glowing Candles. Hope you get a chance to check it out.


This card was entered into the following challenge(s):
613 Avenue Create  -  Challenge #40 - Anything Goes
Word Art Wednesday  -  Challenge #101 - Anything Goes
Sister Act  - Challenge #28 - Anything Goes
Oozak  -  Challenge #23 - Anything Goes


Saturday, October 5, 2013

Happy Holidays Village


Hello everyone! We are having some beautiful fall weather here in my neighborhood and it's not easy trying to think "winter" in the midst of all this warmth. 

But here's another Christmas card I made and just looking at it makes me feel cold. I decided on a green card base. Next I die cut a white layer with a Spellbinders Detailed Scalloped die. I cut out the  center with Spellbinders 5x7  Matting Basics A die which left me with an open frame. Then I embossed another white layer with Marianne Designables Anja's Flower EF and framed it with the scalloped layer. 

For my focal point, I die cut an oval with Marianne Creatables Small Ovals by Petra, added glitter and popped it onto the framed panel with dimensionals. Next I stamped Poppy Stamps Holiday Village in Versamark on white card stock and then embossed it with gold EP. After this I colored the trees and houses with Copic markers, cut out the image with the co-ordianting Poppy Stamps Holiday Village die and popped in onto the glittered oval. 

The sentiment was computer generated, cut out with Spellbinders Ribbon Banners and sponged while still in the die. As the final step, the sentiment banner was adhered to the oval. 

Although it's not entirely visible, the glitter really makes this card sparkle like glistening snow. And we'll be seeing Mother Nature's real life winter beauty in just a few short months.


This card was entered into the following challenge(s):
Word Art Wednesday  - Challenge #100 - Anything Goes
Crafty Catz  -  Challenge #201 - Anything Goes
Speedy Fox & Friends  -  Challenge #180 - Winter Scene
Marianne Designs Divas  -  Anything Goes

Friday, October 4, 2013

White Christmas


I'm dreaming of a white Christmas......and it's only the early part of October! In my opinion, there's nothing like Christmas Day covered with a white blanket of snow.
 
I wanted to make a white on white card and this is what I came up with. My base card measures 5 1/4 x 5 1/4". I embossed a slightly smaller layer with a Nellie Snellen Christmas Square-1 embossing folder and adhered it to the base. The tree was cut with Marianne Creatables Christmas Tree die, glitter added and popped onto the embossed layer with dimensionals. The little poinsettias, which I just love, were cut in red with Poppy Stamps Small Blooming Poinsettia die. A dot of Stickles was added to the centers and then the flowers were adhered to the tree. The sentiment was computer generated and then cut with a Spellbinders Ribbon Banners die and popped on.

I really love this card and I hope you like it too. Until next time, make it a wonderful day!
 

This card was entered into the following challenge(s):
Sister Act  -  Challenge #27 - Anything Goes
613 Avenue Create  -  Challenge #39 - Anything Goes
Word Art Wednesday  - Challenge #100 - Anything Goes
The Outlawz  -  GCC 0930 - Anything Goes
Crafty Catz   -  Challenge #201 - Anything Goes
2 Sisters Challenge Blog  -  Challenge #163 - Anything Goes


Wednesday, October 2, 2013

Christmas Blessings


I just love the traditional Christmas colors: red, green and white. I find them to be so festive and cheerful....and oh so Christmassy!

So here is another Christmas card I made using the traditional colors. I started with a 5x5" base card in white. I added a red layer. Next, I embossed a white layer with a Darice Stripe Background EF and adhered it to the red layer. I cut a panel from red card stock using one of the dies from Spellbinders Marvelous Squares and stamped the sentiment (PTI Signature Christmas) in Versamark and then embossed it with gold EP. This was then adhered to the white layer.

The poinsettia flowers (HFC Christmas Poinsettia) were stamped on red card stock with Versamark, embossed in gold and then cut with HFC Sun Kissed Fleur die. I layered the different size flowers to create the completed poinsettia and adhered it to the lower left corner of the red panel. Finally, I cut some pine sprigs in green card stock with Poppy Stamps Pine Sprigs dies and adhered them to the poinsettia.

As much as I love the traditional colors of Christmas, I plan to make other cards using other colors. But time and time again, I come back to the reds and greens.

Hope you enjoyed this post and will create today!


This card was entered into the following challenge(s):
TTCRD - Oct 1-7 Challenge - Anything Goes
Word Art Wednesday - Challenge #100 - Anything Goes
Sister Act  -  Challenge #26  -  Anything Goes
613 Avenue Create  -  Challenge #39 - Anything Goes
The Outlawz - GCC 0930 - Anything Goes
2 Sisters Challenge Blog  - Challenge #163 - Anything Goes


Tuesday, October 1, 2013

Poinsettia on Mexican Tile Pattern


This card was inspired by one I saw on the Internet. I wasn't sure how it would turn out but I was very pleased with the end result. 

This is a 5x5" square card with a white card base. The red square patterned frame was created with a Cheery Lynn Mexican Tile Pattern die and adhered to the base. I added a white square panel in the center and stamped the sentiment (from GKD's The Magic of Christmas) on all four edges in Versamark and then embossed each with red EP.

For the poinsettia, I stamped a HFC Christmas Poinsettia background stamp on red card stock, embossed it with gold EP and used the HFC Sun Kissed Fleur die to cut out the individual flowers. After shaping each petal and layering and adhering the individual flowers one on top of the other, I adhered the finished poinsettia to the center. The leaves were punched with a MS leaf punch.

Hope you liked it and will be inspired to create your holiday cards. Remember.....there are only 84 days left til Christmas!

This card was entered into the following challenge(s):
TTCRD - Oct 1-7 Challenge - Anything Goes
Word Art Wednesday - Challenge #99 - Anything Goes
Sister Act  -  Challenge #26  -  Anything Goes
613 Avenue Create  -  Challenge #39 - Anything Goes
The Outlawz - GCC 0930 - Anything Goes
2 Sisters Challenge Blog  - Challenge #163 - Anything Goes